はじめに
「pycocotools」がWindowsでもpipを使って簡単にインストールできるようになった。
touch-sp.hatenablog.com
今回はpycocotoolsを使ってCOCO datasets を扱ってみる。
COCO datasetsのダウンロード、解凍
まずはGluonCVのチュートリアルページから「val2017.zip」と「annotations_trainval2017.zip」をダウンロード。
「coco_data」というフォルダを作成しそちらの中にダウンロードしたZIPファイルを解凍する。
以下のような構造にする。
coco_data
|
+---annotations
|       captions_train2017.json
|       captions_val2017.json
|       instances_train2017.json
|       instances_val2017.json
|       person_keypoints_train2017.json
|       person_keypoints_val2017.json
|
+---val2017
        000000000139.jpg
        000000000285.jpg
        000000000632.jpg
        000000000724.jpg
        ......
キーポイント(関節などの位置)を取得して表示する
from pycocotools.coco import COCO
import os
from PIL import Image
import numpy as np
import mxnet as mx

coco = COCO('coco/annotations/person_keypoints_val2017.json')
img_dir = os.path.join('coco', 'val2017')
image_id = 458045

img_filename = coco.imgs[image_id]['file_name']
img = np.array(Image.open(os.path.join(img_dir, img_filename)))

keypoints_list = []
anns_keys = coco.anns.keys()
for key in anns_keys:
    if coco.anns[key]['image_id']==image_id:
        keypoints_list.append(coco.anns[key]['keypoints'])

confidence_list = []
pred_coords_list = []

for i in range(len(keypoints_list)):
    keypoints_array = np.array(keypoints_list[i]).reshape((17,3))

    confidence_list.append(np.where(keypoints_array[:,2]==2, 1, 0).reshape((-1,1)))
    pred_coords_list.append(keypoints_array[:,:2])

pred_coords = mx.nd.array(np.stack(pred_coords_list))
confidence = mx.nd.array(np.stack(confidence_list))

class_IDs = mx.nd.zeros(shape=(1,100,1))
bounding_boxs = mx.nd.zeros(shape=(1,100,4))
scores = mx.nd.zeros(shape=(1,100,1))

from gluoncv import utils
from matplotlib import pyplot as plt
ax = utils.viz.plot_keypoints(img, pred_coords, confidence,
                              class_IDs, bounding_boxs, scores,
                              box_thresh=0.5, keypoint_thresh=0.2)
plt.show()
結果
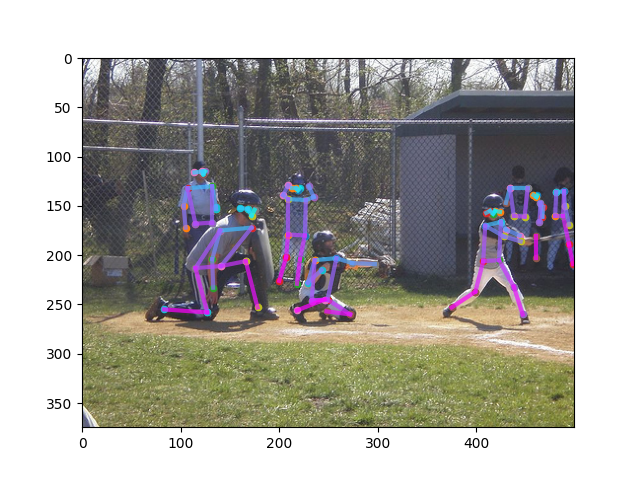
うまく表示できた。
はまった点
- COCO datasetsのkeypointsについて
Annotations for keypoints are just like in Object Detection (Segmentation) above, except a number of keypoints is specified in sets of 3, (x, y, v).
x and y indicate pixel positions in the image.
v indicates visibility— v=0: not labeled (in which case x=y=0), v=1: labeled but not visible, and v=2: labeled and visible
v=0, 1 ⇒ not visible(0に置換が必要)
v=2 ⇒ visible(1に置換が必要)
array([2, 2, 2, 0, 0, 2, 1, 2, 0, 2, 0, 2, 1, 0, 2, 0, 2])

array([1, 1, 1, 0, 0, 1, 0, 1, 0, 1, 0, 1, 0, 0, 1, 0, 1])
上のようなNumpy arrayを下のように変換する必要がある。
思いついた方法は二つ。
np.array([1 if n==2 else 0 for n in sample_array])
np.where(sample_array==2, 1, 0)
環境
Windows 10
GPUなし
Visual Studio 2017 communityインストール済み(←必要かもしれない)
Python 3.7.8
再現できない場合にはVisual Studioをインストールしてみるのが良い。
Visual Studioは2019でも良いと思う。
Visual Studioはcommunity版であれば無料でインストールできる。
Pythonにインストールしたのは「mxnet」と「gluoncv」と「pycocotools」のみ。その他は勝手についてきた。
pip install mxnet==1.7.0 -f https://dist.mxnet.io/python/cpu
pip install gluoncv
pip install pycocotools
certifi==2020.6.20
chardet==3.0.4
cycler==0.10.0
Cython==0.29.21
gluoncv==0.8.0
graphviz==0.8.4
idna==2.6
kiwisolver==1.2.0
matplotlib==3.3.2
mxnet==1.7.0
numpy==1.16.6
Pillow==8.0.1
portalocker==2.0.0
pycocotools==2.0.2
pyparsing==2.4.7
python-dateutil==2.8.1
pywin32==228
requests==2.18.4
scipy==1.5.3
six==1.15.0
tqdm==4.51.0
urllib3==1.22
補足
画像の説明文を扱うにはこちらを参照。
touch-sp.hatenablog.com
変更履歴
変更前
img_filename = os.path.split(coco.imgs[image_id]['coco_url'])[1]
変更後
img_filename = coco.imgs[image_id]['file_name']
変更前
    confidence_list.append(mx.nd.array(np.where(keypoints_array[:,2]==2, 1, 0).reshape((-1,1))))
    pred_coords_list.append(mx.nd.array(keypoints_array[:,:2]))

from gluoncv.data.batchify import Stack
pred_coords = Stack()(pred_coords_list)
confidence = Stack()(confidence_list)
変更後
    confidence_list.append(np.where(keypoints_array[:,2]==2, 1, 0).reshape((-1,1)))
    pred_coords_list.append(keypoints_array[:,:2])

pred_coords = mx.nd.array(np.stack(pred_coords_list))
confidence = mx.nd.array(np.stack(confidence_list))