はじめに
PythonスクリプトにWPFでUIを構築します。C#の「ProcessStart」でPythonスクリプトを実行します。
Pythonスクリプトの結果はクリップボード経由でC#に返します。使用するPython環境と画像はUIから選択するようにしました。これが地味に便利です。これだけでもUIを構築する意義があったと感じています。今まではTerminalからPython仮想環境をactivate、画像ファイルのPATHを指定して実行という手順を踏んでいました。この作業がなくなりました。また、C#とPythonは独立しているのでPythonスクリプトを書き換えてもコンパイルをやり直す必要がありません。詳細は過去の2記事を参照して下さい。
- GluonCVを使って物体検出(YOLO-v3) わずか11行でできた! - パソコン関連もろもろ
- 【WPF】【C#】【Python】クリップボード経由でPythonからC#に画像を送る - パソコン関連もろもろ
今回作ったもの
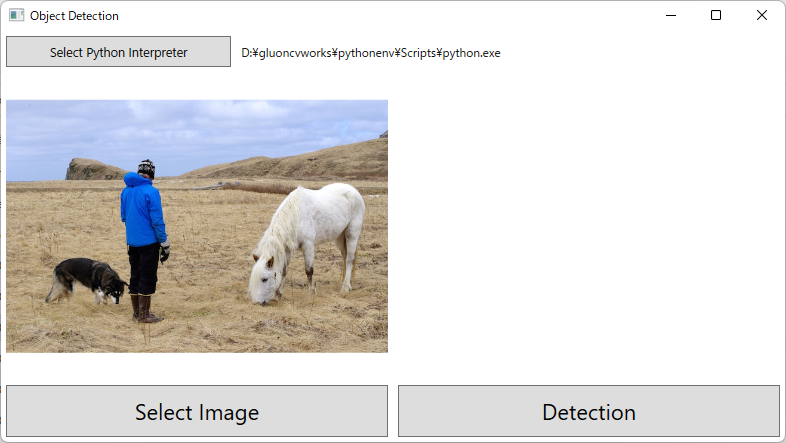
操作中の画面
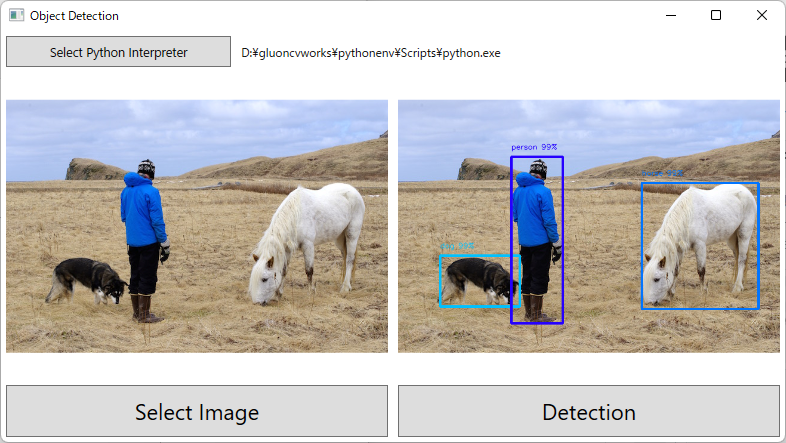
結果出力後の画面
開発環境
Windows 11
Core i7-7700K + GTX 1080
Visual Studio Community 2019
.NET 5.0

Python 3.7.9
mxnet-cu102==1.7.0
gluoncv==0.10.4.post4
Pillow==8.3.2
pywin32==301
Windows11でやっていますがもちろんWindows10でも問題ありません。
GPUがなくても大丈夫です。その際は「mxnet-cu102」ではなく「mxnet」をインストールして下さい。
MXNetのインストールはこちらを参照して下さい。
方法
Pythonスクリプト
結果をクリップボードに貼り付けるように最後の部分のみ変更が必要です。スクリプトファイルはexeファイルと同じフォルダに置く必要があります。
import sys
import mxnet as mx
from gluoncv import model_zoo, data, utils
import io
from PIL import Image
import win32clipboard as cb

ctx = mx.gpu() if mx.context.num_gpus() >0 else mx.cpu()

im_fname = sys.argv[1]

net = model_zoo.get_model('yolo3_darknet53_voc', pretrained=True, ctx=ctx, root="./models")

x, img = data.transforms.presets.yolo.load_test(im_fname, short=512)

class_IDs, scores, bounding_boxs = net(x.as_in_context(ctx))

imgArry = utils.viz.cv_plot_bbox(img, bounding_boxs[0], scores[0], class_IDs[0], class_names=net.classes, linewidth=3)

im = Image.fromarray(imgArry)

with io.BytesIO() as f:
    im.convert('RGB').save(f, 'BMP')
    data = f.getvalue()[14:]

cb.OpenClipboard()
cb.EmptyClipboard()
cb.SetClipboardData(cb.CF_DIB, data)
cb.CloseClipboard()
「plot_bbox」を「cv_plot_bbox」に変更しています。戻り値がmatplotlib形式かnumpy配列かの違いです。クリップボードにコピーする際にPIL形式に変更するのでnumpy配列の方が都合が良いです。そのため「cv_plot_bbox」を使っています。
C#のコード
WPFですが「XAML」は記述していません。UIはC#で構築しています。Gridを使いやすくするためにMyFuncクラスを書きました。詳細はこちらを見て下さい。
MyFuncクラス
using System.Windows;
using System.Windows.Controls;

static class Myfunc
{
    public static Grid NewGrid(string row, string col) //引数はカンマ区切りで
    {
        Grid grid = new();

        string[] grid_row = row.Split(",");
        string[] grid_col = col.Split(",");

        if (grid_row.Length > 1)
        {
            foreach (string each in grid_row)
            {
                if (int.TryParse(each, out int each_num))
                {
                    grid.RowDefinitions.Add(new RowDefinition() { Height = new GridLength(each_num, GridUnitType.Star) });
                }
                else
                {
                    grid.RowDefinitions.Add(new RowDefinition() { Height = GridLength.Auto });
                }
            }
        }
        if (grid_col.Length > 1)
        {
            foreach (string each in grid_col)
            {
                if (int.TryParse(each, out int each_num))
                {
                    grid.ColumnDefinitions.Add(new ColumnDefinition() { Width = new GridLength(each_num, GridUnitType.Star) });
                }
                else
                {
                    grid.ColumnDefinitions.Add(new ColumnDefinition() { Width = GridLength.Auto });
                }
            }
        }
        return grid;
    }
    public static Grid AddChild(this Grid grid, UIElement element, int row, int col, int row_span, int col_span)
    {
        Grid.SetRow(element, row);
        Grid.SetRowSpan(element, row_span);
        Grid.SetColumn(element, col);
        Grid.SetColumnSpan(element, col_span);
        grid.Children.Add(element);

        return grid;
    }
}
WindowSettingメソッド
GUI構築部分はMainWindowクラスの中にWindowSettingメソッドを作成しその中に記述しました。MyFuncクラスを使っているためそれなりに簡潔に書くことができます。using System.Windows; using System.Windows.Controls; namespace ObjectDetection { public partial class MainWindow : Window { Image originalImage = new() { Margin = new Thickness(5) }; Image resultImage = new() { Margin = new Thickness(5) }; Label selectedPythonLabel = new() { Content = "", VerticalAlignment = VerticalAlignment.Center, HorizontalAlignment = HorizontalAlignment.Left }; Button pythonselectButton = new() { Content = new Viewbox() { Child = new Label() { Content = "Select Python Interpreter" } }, Margin = new Thickness(5) }; Button left_button = new() { Content = new Viewbox() { Child = new Label() { Content = "Select Image" } }, Margin = new Thickness(5) }; Button right_button = new() { Content = new Viewbox() { Child = new Label() { Content = "Detection" } }, Margin = new Thickness(5) }; private void WindowSetting() { Title = "Object Detection"; pythonselectButton.Click += SelectPythonInterpreter; left_button.Click += PushLeftButton; right_button.Click += PushRightButton; Grid mainGrid = Myfunc.NewGrid("1,9", ""); Content = mainGrid; Grid upperGrid = Myfunc.NewGrid("", "3,7"); mainGrid.AddChild(upperGrid, 0, 0, 1, 1); upperGrid.AddChild(pythonselectButton, 0, 0, 1, 1); upperGrid.AddChild(selectedPythonLabel, 0, 1, 1, 1); Grid lowerGrid = Myfunc.NewGrid("", "1,1"); mainGrid.AddChild(lowerGrid, 1, 0, 1, 1); Grid leftPanel = Myfunc.NewGrid("5,1", ""); lowerGrid.AddChild(leftPanel, 0, 0, 1, 1); Grid rightPanel = Myfunc.NewGrid("5,1", ""); lowerGrid.AddChild(rightPanel, 0, 1, 1, 1); leftPanel.AddChild(originalImage, 0, 0, 1, 1); leftPanel.AddChild(left_button, 1, 0, 1, 1); rightPanel.AddChild(resultImage, 0, 0, 1, 1); rightPanel.AddChild(right_button, 1, 0, 1, 1); } } }
MainWindowクラス
using Microsoft.Win32;
using System;
using System.Diagnostics;
using System.Windows;
using System.Windows.Media;
using System.Windows.Media.Imaging;

namespace ObjectDetection
{
    public partial class MainWindow : Window
    {
        string selectedfilePath = "";
        string selectedPythonPath = "";

        Process pythonProcess;

        public MainWindow()
        {
            InitializeComponent();
            WindowSetting();
        }
        private void SelectPythonInterpreter(object sender, RoutedEventArgs e)
        {
            var dialog = new OpenFileDialog();
            dialog.Filter = "Python実行ファイル (*.exe)|*.exe";
            if (dialog.ShowDialog() == true)
            {
                selectedPythonPath = dialog.FileName;
                selectedPythonLabel.Content = selectedPythonPath;
            }
        }
        private void PushLeftButton(object sender, RoutedEventArgs e)
        {
            var dialog = new OpenFileDialog();
            dialog.Filter = "画像ファイル (*.jpg)|*.jpg";
            if (dialog.ShowDialog() == true)
            {
                selectedfilePath = dialog.FileName;
                originalImage.Source = new BitmapImage(new Uri(selectedfilePath));
                resultImage.Source = null;
            }
        }
        private void PushRightButton(object sender, RoutedEventArgs e)
        {
            if (selectedfilePath != "" && selectedPythonPath != "")
            {
                pythonProcess = new Process
                {
                    StartInfo = new ProcessStartInfo(selectedPythonPath)
                    {
                        UseShellExecute = false,
                        CreateNoWindow = true,
                        Arguments = "detection.py" + " " + selectedfilePath
                    }
                };
                using (pythonProcess)
                {
                    pythonProcess.Start();
                    pythonProcess.WaitForExit();
                }
                BitmapSource image = Clipboard.GetImage();
                if (image != null)
                {
                    resultImage.Source = new FormatConvertedBitmap(image, PixelFormats.Bgr32, null, 0);
                }
            }
        }
    }
}