公開日:2021年10月26日
最終更新日:2022年9月21日
はじめに
最近PyTorchの勉強を始めたのですが「MMDetection」というものの存在を知りました。「Detection」という名前の通り物体検出モデルを使うためのツールですが様々なモデルが用意されています。さっそく使ってみたいと思います。今回は推論のみです。チュートリアル通りに使っても面白くないので今回はサクッと推論する方法を紹介します。以下の人が対象です。- GitHubのリポジトリをクローンする(git clone)なんてできない、またはやりたくない
- Pythonの環境構築は単純にpipだけで済ませたい
- 学習済みパラメータを事前にダウンロードするなんて面倒くさい
方法
pipだけでPython環境構築をして、スクリプトを実行するだけで推論ができるようにしました。もちろんgit cloneは不要です。Windowsで動作確認しています。Python環境構築
Windows 11
CUDA 11.6.2
Python 3.9.13
環境構築はこれだけです。
pip install torch torchvision --extra-index-url https://download.pytorch.org/whl/cu116
pip install mmcv-full==1.6.1 -f https://download.openmmlab.com/mmcv/dist/cu116/torch1.12.0/index.html
pip install mmdet
pip install openmim
pip install mmengine
実行スクリプト
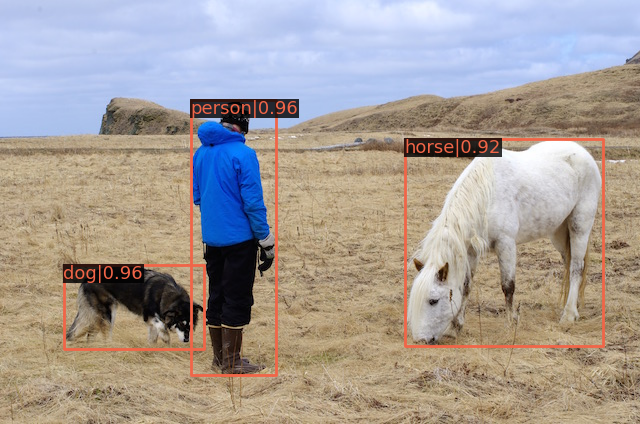
必要なもののダウンロードはすべてスクリプト内に落とし込みました。スクリプトを適当な名前で保存して実行するのみです。サンプル画像もダウンロードされます。DETRとVFNetという二つのモデルで動作確認しました。DETR
import os
import torch
from mmdet.apis import inference_detector, init_detector, show_result_pyplot
from torchvision.datasets.utils import download_url
from mim.commands.download import download

device = 'cuda' if torch.cuda.is_available() else 'cpu'

os.makedirs('models', exist_ok=True)

checkpoint_name = 'detr_r50_8x2_150e_coco'
config_fname = checkpoint_name + '.py'

checkpoint = download(package="mmdet", configs=[checkpoint_name], dest_root="models")[0]

model = init_detector(os.path.join('models', config_fname), os.path.join('models', checkpoint), device = device)

img_url = 'https://raw.githubusercontent.com/zhreshold/mxnet-ssd/master/data/demo/person.jpg'
img_fname = img_url.split('/')[-1]
download_url(img_url, root = '.', filename = img_fname)

result = inference_detector(model, img_fname)
show_result_pyplot(model, img_fname, result, score_thr = 0.8)
VFNet
「checkpoint_name」の部分を変更するのみです。import os import torch from mmdet.apis import inference_detector, init_detector, show_result_pyplot from torchvision.datasets.utils import download_url from mim.commands.download import download device = 'cuda' if torch.cuda.is_available() else 'cpu' os.makedirs('models', exist_ok=True) checkpoint_name = 'vfnet_r50_fpn_1x_coco' config_fname = checkpoint_name + '.py' checkpoint = download(package="mmdet", configs=[checkpoint_name], dest_root="models")[0] model = init_detector(os.path.join('models', config_fname), os.path.join('models', checkpoint), device = device) img_url = 'https://raw.githubusercontent.com/zhreshold/mxnet-ssd/master/data/demo/person.jpg' img_fname = img_url.split('/')[-1] download_url(img_url, root = '.', filename = img_fname) result = inference_detector(model, img_fname) show_result_pyplot(model, img_fname, result, score_thr = 0.8)
結果

関連記事
AutoGluonからMMDetectionを使う方法を記事にしました。touch-sp.hatenablog.com
2022年9月21日追記:学習編
MMDetectionを使って転移学習について記事を書きました。touch-sp.hatenablog.com