はじめに
前回実行中のPythonからC#へ文字列をリアルタイムに送るプログラムを書きました。今回はその逆のプログラムを書きたいと思います。つまりC#からPythonへデータをリアルタイムに送ります。
Pythonスクリプトを実行する時に引数を渡すことは簡単ですが今回は実行中のPythonにデータを送るのでやや難しくなります。
今回やったこと
画像をみてもらった方がわかりやすいと思います。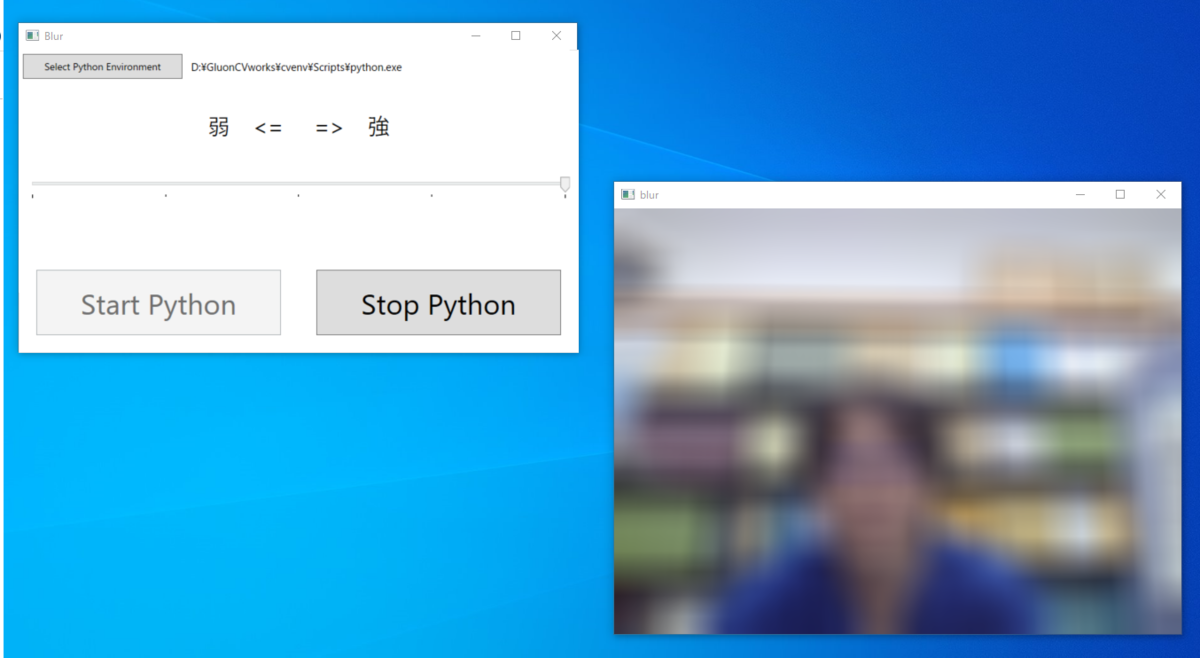
左上がWPFで作成したWindowです。真ん中にスライダーを配置しています。
右下はPython内のOpneCVでWebカメラからの映像を出力しているものです。
左上のWindow内のスライダーを動かすと右下の映像のぼかし強度がリアルタイムに変わるようになっています。
環境
Windows 10

Visual Studio Community 2019
.NET 5.0

Python 3.9.7
opencv-python==4.5.3.56
Pythonにインストールしたのは「opencv-python」のみです。pipでインストール可能です。
方法
Webカメラからの映像を画面出力する
import cv2

cap = cv2.VideoCapture(0, cv2.CAP_DSHOW)

while True:
    ret, frame = cap.read()

    cv2.imshow('normal', frame)

    if cv2.waitKey(1) & 0xFF == 27:
        break

cap.release()
cv2.destroyAllWindows()
上のスクリプトが動画を扱う時のopencv-pythonの基本形です。
Webカメラからの映像にぼかしを入れて画面出力する
画像にぼかしを入れるときには次の2行を追加するだけです。strength = 10
frame = cv2.blur(frame, (strength, strength))
「strength」の値は任意です。数字が大きくなるとぼかし強度が強くなります。
最終的にはこうなります。
import cv2

strength = 10

cap = cv2.VideoCapture(0, cv2.CAP_DSHOW)

while True:
    ret, frame = cap.read()

    frame = cv2.blur(frame, (strength, strength))
    cv2.imshow('blur', frame)

    if cv2.waitKey(1) & 0xFF == 27:
        break

cap.release()
cv2.destroyAllWindows()
「cv2.imshow」の引数「'normal'」、「'blur'」はWindowタイトルなので何でも構いません。
ぼかし強度をインタラクティブに変更する
上記スクリプトの「strength」変数の値を変更するとぼかし強度が変更できます。それをインタラクティブに行うには入力を受け付けるスレッドを別に立てる必要があります。
次の3つをスクリプトに追加しました。
from threading import Thread
def input_from_terminal():
    global strength
    while True:
        input_word = input()
        if input_word == 'up' and strength < 50:
            strength += 10
        if input_word == 'down' and strength > 10:
            strength -= 10
thread1 = Thread(target=input_from_terminal)
thread1.daemon = True
thread1.start()
これでPythonスクリプトを実行したターミナル(コマンドプロンプトなど)に「up」、「down」と入力するとぼかし強度が変更されます。
最終的にはこうなります。
import cv2
from threading import Thread

strength = 10

def input_from_terminal():
    global strength
    while True:
        input_word = input()
        if input_word == 'up' and strength < 50:
            strength += 10
        if input_word == 'down' and strength > 10:
            strength -= 10

thread1 = Thread(target=input_from_terminal)
thread1.daemon = True
thread1.start()

cap = cv2.VideoCapture(0, cv2.CAP_DSHOW)

while True:
    ret, frame = cap.read()

    frame = cv2.blur(frame, (strength, strength))
    cv2.imshow('blur', frame)

    if cv2.waitKey(1) & 0xFF == 27:
        break

cap.release()
cv2.destroyAllWindows()
この入力部分(「up」、「down」の入力)をC#側に任せてしまおうというのが今回の目的です。
C#から数字を受け取る
「up」、「down」ではなくC#側からは直接数字を受け取るようにしました。それにより「input_from_terminal」はより簡潔に書けます。
def input_from_terminal():
    global strength
    while True:
        input_word = input()
        strength = int(input_word)
最終的にはこうなります。
import cv2
from threading import Thread

strength = 10

def input_from_terminal():
    global strength
    while True:
        input_word = input()
        strength = int(input_word)

thread1 = Thread(target=input_from_terminal)
thread1.daemon = True
thread1.start()

cap = cv2.VideoCapture(0, cv2.CAP_DSHOW)

while True:
    ret, frame = cap.read()

    frame = cv2.blur(frame, (strength, strength))
    cv2.imshow('blur', frame)

    if cv2.waitKey(1) & 0xFF == 27:
        break

cap.release()
cv2.destroyAllWindows()
Python側はこれで終了です。このスクリプトをC#から実行します。
C#側のポイント
ポイントは3点です。RedirectStandardInput = true,
StreamWriter myStreamWriter;
myStreamWriter = myProcess.StandardInput;
private void slider_ValueChanged(object sender, RoutedPropertyChangedEventArgs<double> e)
        {
            myStreamWriter.WriteLine(sl.Value.ToString());
        }
C#コード
メインコード
GUI部分を除くコードは最終的にこのようになりました。using System; using System.Diagnostics; using System.IO; using System.Windows; namespace toPython { public partial class MainWindow : Window { Process myProcess; StreamWriter myStreamWriter; public MainWindow() { InitializeComponent(); WindowSettings(); } private void PushStartButton(object sender, RoutedEventArgs e) { if (String.IsNullOrEmpty(selectedPythonPath)) return; PythonStart.IsEnabled = false; PythonStop.IsEnabled = true; sl.Value = 10; string myPythonApp = "cv.py"; myProcess = new Process { StartInfo = new ProcessStartInfo(selectedPythonPath) { UseShellExecute = false, RedirectStandardInput = true, CreateNoWindow = true, Arguments = myPythonApp } }; myProcess.Start(); myStreamWriter = myProcess.StandardInput; } private void PushStopButton(object sender, RoutedEventArgs e) { myProcess.Kill(); PythonStop.IsEnabled = false; PythonStart.IsEnabled = true; } private void slider_ValueChanged(object sender, RoutedPropertyChangedEventArgs<double> e) { myStreamWriter.WriteLine(sl.Value.ToString()); } } }
GUI部分のコード
using System.Windows;
using System.Windows.Controls;
using Microsoft.Win32;
using System.Windows.Media;
using System.Windows.Controls.Primitives;

namespace toPython
{
    public partial class MainWindow : Window
    {
        string selectedPythonPath;

        Button selectPythonButton = new Button()
        {
            Content = new Viewbox() { Child = new Label() { Content = "Select Python Environment" } },
            Margin = new Thickness(5)
        };
        Label selectedPythonLabel = new Label()
        {
            Content = "",
            VerticalAlignment = VerticalAlignment.Center,
            HorizontalAlignment = HorizontalAlignment.Left
        };
        Slider sl = new()
        {
            Foreground = Brushes.Black,
            Margin = new Thickness(10),
            Maximum = 50,
            Minimum = 10,
            TickFrequency = 10,
            TickPlacement = TickPlacement.BottomRight,
            IsSnapToTickEnabled = true
        };
        Button PythonStart = new()
        {
            Content = new Viewbox() { Child = new Label() { Content = "Start Python" } },
            Margin = new Thickness(20)
        };
        Button PythonStop = new()
        {
            Content = new Viewbox() { Child = new Label() { Content = "Stop Python" } },
            Margin = new Thickness(20),
            IsEnabled = false
        };

        private void WindowSettings()
        {
            Title = "Blur";

            selectPythonButton.Click += PushselectPythonButton;
            PythonStart.Click += PushStartButton;
            PythonStop.Click += PushStopButton;

            sl.ValueChanged += slider_ValueChanged;

            Grid mainGrid = Myfunc.NewGrid("1,5,3", "");
            Content = mainGrid;

            Grid upperGrid = Myfunc.NewGrid("", "3,7");
            mainGrid.AddChild(upperGrid, 0, 0, 1, 1);
            upperGrid.AddChild(selectPythonButton, 0, 0, 1, 1);
            upperGrid.AddChild(selectedPythonLabel, 0, 1, 1, 1);

            Grid centerGrid = Myfunc.NewGrid("1,1", "");
            mainGrid.AddChild(centerGrid, 1, 0, 1, 1);

            Label tickLabel = new Label()
            {
                Content = "弱 <=     => 強",
                VerticalAlignment = VerticalAlignment.Center,
                HorizontalAlignment = HorizontalAlignment.Center
            };
            Viewbox vb = new() { Child = tickLabel, Margin = new Thickness(20) };
            centerGrid.AddChild(vb, 0, 0, 1, 1);
            centerGrid.AddChild(sl, 1, 0, 1, 1);

            Grid lowerGrid = Myfunc.NewGrid("", "1,1");
            mainGrid.AddChild(lowerGrid, 2, 0, 1, 1);
            lowerGrid.AddChild(PythonStart, 0, 0, 1, 1);
            lowerGrid.AddChild(PythonStop, 0, 1, 1, 1);
        }
        private void PushselectPythonButton(object sender, RoutedEventArgs e)
        {
            var dialog = new OpenFileDialog();
            dialog.Filter = "Python実行ファイル (*.exe)|*.exe";
            if (dialog.ShowDialog() == true)
            {
                selectedPythonPath = dialog.FileName;
                selectedPythonLabel.Content = selectedPythonPath;
            }
        }
    }
}
MyFuncクラス
GUIを簡潔に書くためにMyFuncクラスを使用しています。詳細はこちらを参照して下さい。
using System.Windows;
using System.Windows.Controls;

static class Myfunc
{
    public static Grid NewGrid(string row, string col) //引数はカンマ区切りで
    {
        Grid grid = new Grid();

        string[] grid_row = row.Split(",");
        string[] grid_col = col.Split(",");

        if (grid_row.Length > 1)
        {
            foreach (string each in grid_row)
            {
                if (int.TryParse(each, out int each_num))
                {
                    grid.RowDefinitions.Add(new RowDefinition() { Height = new GridLength(each_num, GridUnitType.Star) });
                }
                else
                {
                    grid.RowDefinitions.Add(new RowDefinition() { Height = GridLength.Auto });
                }
            }
        }
        if (grid_col.Length > 1)
        {
            foreach (string each in grid_col)
            {
                if (int.TryParse(each, out int each_num))
                {
                    grid.ColumnDefinitions.Add(new ColumnDefinition() { Width = new GridLength(each_num, GridUnitType.Star) });
                }
                else
                {
                    grid.ColumnDefinitions.Add(new ColumnDefinition() { Width = GridLength.Auto });
                }
            }
        }
        return grid;
    }
    public static Grid AddChild(this Grid grid, UIElement element, int row, int col, int row_span, int col_span)
    {
        Grid.SetRow(element, row);
        Grid.SetRowSpan(element, row_span);
        Grid.SetColumn(element, col);
        Grid.SetColumnSpan(element, col_span);
        grid.Children.Add(element);

        return grid;
    }
}