はじめに
前回Webカメラの映像を枠なしで表示することができました。touch-sp.hatenablog.com
それによってOBS Studioでウィンドウキャプチャした後にトリミングの作業が必要なくなりました。
今回は以前作ったカメラアプリの操作部分と表示部分を分離させることに挑戦しました。
touch-sp.hatenablog.com
結果
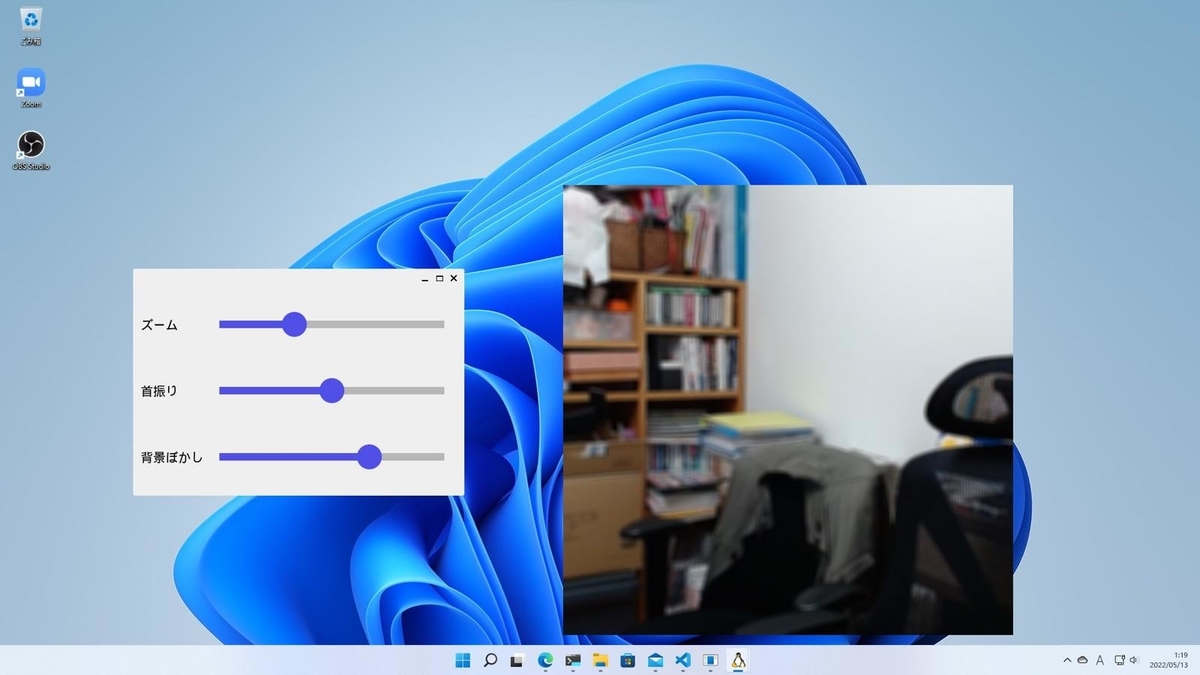
冒頭の画像のようにうまくいきました。「背景ぼかし」は人物以外の背景をぼかす機能です。人物が写っていないので全体にぼかしが効いています。Pythonスクリプト
1ファイルで完結するようにスクリプトを書きました。そのためやや長くなっています。以前はPyQt6を使っていましたが今回はPySide6を使っています。import sys import cv2 import numpy as np from PySide6.QtCore import Qt, Signal, Slot, QThread, QSize from PySide6.QtWidgets import QMainWindow, QApplication, QWidget, QLabel, QGridLayout, QSlider from PySide6.QtGui import QImage, QPixmap import torch from torchvision import transforms QSS = """ QSlider::groove:horizontal { border: 1px solid; height: 10px; /*margin: 30px;*/ background-color: rgb(238, 238, 238); /*position: absolute;*/ left: 20px; right: 20px; } QSlider::handle:horizontal { background-color: rgb(80, 80, 232); height: 40px; width: 40px; border-radius: 20px; margin: -15px -20px; } QSlider::handle:horizontal:pressed { background-color: rgb(148, 148, 254); } QSlider::add-page:horizontal { background: rgb(183, 183, 183); } QSlider::sub-page:horizontal { background: rgb(80, 80, 232); } """ device = 'cuda' if torch.cuda.is_available() else 'cpu' transform_fn = transforms.Compose([ transforms.ToTensor(), transforms.Normalize([.485, .456, .406], [.229, .224, .225]), ]) model = torch.hub.load('pytorch/vision:v0.10.0', 'deeplabv3_resnet50', pretrained=True) model.eval().to(device) class VideoThread(QThread): change_pixmap_signal = Signal(QImage) playing = True cap = cv2.VideoCapture(0) cap.set(cv2.CAP_PROP_FOURCC, cv2.VideoWriter_fourcc('M', 'J', 'P', 'G')) cap.set(cv2.CAP_PROP_FRAME_WIDTH, 1280) cap.set(cv2.CAP_PROP_FRAME_HEIGHT, 720) crop = 0 leftside = 280 bokashi = 0 def run(self): while self.playing: ret, frame = self.cap.read() frame = frame[:, self.leftside:self.leftside+720, :] if not self.crop == 0: frame = cv2.resize(frame[self.crop:-self.crop, self.crop:-self.crop, :], dsize = (720, 720)) if not self.bokashi == 0: frame_rgb = cv2.cvtColor(frame, cv2.COLOR_BGR2RGB) input_tensor = transform_fn(frame_rgb) input_batch = input_tensor.unsqueeze(0) with torch.no_grad(): output = model(input_batch.to(device))['out'][0] predict = output.argmax(0).to('cpu').numpy() mask_1 = np.where(predict == 15, 1, 0)[...,np.newaxis] mask_2 = np.where(predict == 15, 0, 1)[...,np.newaxis] if self.bokashi ==0: blurred_img = cv2.blur(frame, (1, 1)) else: blurred_img = cv2.blur(frame, (self.bokashi, self.bokashi)) frame = (frame * mask_1 + blurred_img * mask_2).astype('uint8') h, w, ch = frame.shape bytesPerLine = ch * w image = QImage(frame.copy(), w, h, bytesPerLine, QImage.Format.Format_BGR888) self.change_pixmap_signal.emit(image) self.cap.release() def stop(self): self.playing = False self.wait() def set_zoom_scale(self, x): self.crop = x def set_move_scale(self, x): self.leftside = x def set_blur_scale(self, x): self.bokashi = x class ImageWindow(QMainWindow): def __init__(self): super().__init__() self.setWindowTitle('video capture') self.setFixedSize(QSize(720, 720)) self.setWindowFlags(Qt.FramelessWindowHint) self.label1 = QLabel() self.setCentralWidget(self.label1) class ControlWindow(QMainWindow): def __init__(self): super().__init__() self.subWindow = ImageWindow() self.subWindow.show() self.thread = VideoThread() self.thread.change_pixmap_signal.connect(self.update_image) self.thread.start() self.initUI() def initUI(self): zoom_label = QLabel('ズーム') zoom_label.setStyleSheet('font: 20px; font-weight') move_label = QLabel('首振り') move_label.setStyleSheet('font: 20px; font-weight') blur_label = QLabel('背景ぼかし') blur_label.setStyleSheet('font: 20px; font-weight') self.zoom_slider = QSlider(Qt.Orientation.Horizontal) self.zoom_slider.setFixedSize(QSize(400, 100)) self.zoom_slider.setStyleSheet(QSS) self.zoom_slider.setMaximum(6) self.zoom_slider.setMinimum(0) self.zoom_slider.setValue(0) self.zoom_slider.valueChanged.connect(self.zoom_slider_change) self.move_slider = QSlider(Qt.Orientation.Horizontal) self.move_slider.setFixedSize(QSize(400, 100)) self.move_slider.setStyleSheet(QSS) self.move_slider.setMaximum(8) self.move_slider.setMinimum(0) self.move_slider.setValue(4) self.move_slider.valueChanged.connect(self.move_slider_change) self.blur_slider = QSlider(Qt.Orientation.Horizontal) self.blur_slider.setFixedSize(QSize(400, 100)) self.blur_slider.setStyleSheet(QSS) self.blur_slider.setMaximum(3) self.blur_slider.setMinimum(0) self.blur_slider.setValue(0) self.blur_slider.valueChanged.connect(self.blur_slider_change) layout = QGridLayout() layout.addWidget(zoom_label, 0, 0) layout.addWidget(move_label, 1, 0) layout.addWidget(blur_label, 2, 0) layout.addWidget(self.zoom_slider, 0, 1, 1, 4) layout.addWidget(self.move_slider, 1, 1, 1, 4) layout.addWidget(self.blur_slider, 2, 1, 1, 4) mainWidget = QWidget() mainWidget.setLayout(layout) self.setCentralWidget(mainWidget) @Slot(QImage) def update_image(self, image): self.subWindow.label1.setPixmap(QPixmap.fromImage(image)) def closeEvent(self, e): self.thread.stop() self.subWindow.close() e.accept() def zoom_slider_change(self): self.thread.set_zoom_scale(self.zoom_slider.value() * 30) def move_slider_change(self): self.thread.set_move_scale(self.move_slider.value() * 70) def blur_slider_change(self): self.thread.set_blur_scale(self.blur_slider.value() * 5) if __name__ == "__main__": app = QApplication([]) ex =ControlWindow() ex.show() app.exec()
ポイント
映像表示のためのウィンドウは枠なしですがウィンドウタイトルを付けておかないとOBS Studioでキャプチャできませんでした。QSliderは以前にカスタマイズしたものを使用しています。touch-sp.hatenablog.com
動作環境
使用したPCはこちらです。Ubuntu 22.04 on WSL2 (Windows 11) Python 3.10.4
certifi==2021.10.8
charset-normalizer==2.0.12
idna==3.3
numpy==1.22.3
opencv-python==4.5.5.64
Pillow==9.1.0
PySide6==6.3.0
PySide6-Addons==6.3.0
PySide6-Essentials==6.3.0
requests==2.27.1
shiboken6==6.3.0
torch==1.11.0+cu113
torchvision==0.12.0+cu113
typing_extensions==4.2.0
urllib3==1.26.9
各種設定
いろいろな設定は過去に記事を書いていますので良かったら読んでみて下さい。Ubuntu 22.04の設定
touch-sp.hatenablog.comtouch-sp.hatenablog.com
touch-sp.hatenablog.com
OBS Studioの設定
touch-sp.hatenablog.comつづき
つづきの記事を書きました。touch-sp.hatenablog.com