はじめに
こちらのstylegan3-editingを試してみました。github.com
InterFaceGANを使う方法とStyleCLIPを使う方法の2種類が紹介されています。
今回は前編としてInterFaceGANを使う方法を試してみます。
環境構築
2024年1月17日にUbuntu 20.04からUbuntu 22.04に変更してこの部分を大幅に書き換えました。cuDNNのインストールが必要です。Ubuntu 22.04 on WSL2 CUDA 11.7 Python 3.10
あらかじめこちらをインストールしました。
sudo apt install cmake
sudo apt install build-essential
Python環境構築
pip install torch==1.13.1+cu117 torchvision==0.14.1+cu117 --extra-index-url https://download.pytorch.org/whl/cu117
pip install scipy
pip install matplotlib
pip install tqdm
pip install opencv-python
pip install scikit-learn
pip install imageio
pip install dataclasses
pip install pyrallis
pip install gdown
pip install dlib
pip install ftfy
pip install ninja
beautifulsoup4==4.12.2
certifi==2023.11.17
charset-normalizer==3.3.2
contourpy==1.2.0
cycler==0.12.1
dataclasses==0.6
dlib==19.24.2
filelock==3.13.1
fonttools==4.47.2
ftfy==6.1.3
gdown==4.7.3
idna==3.6
imageio==2.33.1
joblib==1.3.2
kiwisolver==1.4.5
matplotlib==3.8.2
mypy-extensions==1.0.0
ninja==1.11.1.1
numpy==1.26.3
opencv-python==4.9.0.80
packaging==23.2
pillow==10.2.0
pyparsing==3.1.1
pyrallis==0.3.1
PySocks==1.7.1
python-dateutil==2.8.2
PyYAML==6.0.1
requests==2.31.0
scikit-learn==1.3.2
scipy==1.11.4
six==1.16.0
soupsieve==2.5
threadpoolctl==3.2.0
torch==1.13.1+cu117
torchvision==0.14.1+cu117
tqdm==4.66.1
typing-inspect==0.9.0
typing_extensions==4.9.0
urllib3==2.1.0
wcwidth==0.2.13
実行方法
リポジトリをクローンした後に「downloaded」フォルダを新規に作成します。そのフォルダ内に「shape_predictor_68_face_landmarks.dat」をダウンロードします。git clone https://github.com/yuval-alaluf/stylegan3-editing.git cd stylegan3-editing mkdir downloaded cd downloaded wget http://dlib.net/files/shape_predictor_68_face_landmarks.dat.bz2 bzip2 -dk shape_predictor_68_face_landmarks.dat.bz2 cd ../
その後以下のファイルを実行するのみです。必要なファイルは自動でダウンロードされます。
import argparse
import os
import dlib
import torch
from gdown import download
from torchvision import transforms
from utils.alignment_utils import align_face, crop_face, get_stylegan_transform
from utils.inference_utils import run_on_batch, load_encoder, get_average_image

parser = argparse.ArgumentParser()
parser.add_argument('--input', type=str, help='path of image file')
parser.add_argument('--direction', type = str, default = 'age', help = 'age, smile, pose, or Male')
parser.add_argument('--min', type = int, default = -5, help='min:-10, max:10, step:1')
parser.add_argument('--max', type = int, default = 5, help='min:-10, max:10, step:1')
args = parser.parse_args()

image_path = args.input
edit_direction = args.direction
min_value = args.min
max_value = args.max

model_path = os.path.join('downloaded', 'restyle_pSp_ffhq.pt')
if not os.path.exists(model_path):
    download('https://drive.google.com/uc?id=12WZi2a9ORVg-j6d9x4eF-CKpLaURC2W-', model_path, quiet = False)

npy_files = [
    ('age_boundary.npy', '1NQVOpKX6YZKVbz99sg94HiziLXHMUbFS'),
    ('Smiling_boundary.npy', '1KgfJleIjrKDgdBTN4vAz0XlgSaa9I99R'),
    ('pose_boundary.npy', '1nCzCR17uaMFhAjcg6kFyKnCCxAKOCT2d'),
    ('Male_boundary.npy', '18dpXS5j1h54Y3ah5HaUpT03y58Ze2YEY')
]

os.makedirs('editing/interfacegan/boundaries/ffhq', exist_ok=True)
for file_name, file_id in npy_files:
    save_path = os.path.join('editing/interfacegan/boundaries/ffhq', file_name)
    if not os.path.exists(save_path):
        download(f'https://drive.google.com/uc?id={file_id}', save_path, quiet = False)

transform_fn = transforms.Compose([
    transforms.Resize((256, 256)),
    transforms.ToTensor(),
    transforms.Normalize([0.5, 0.5, 0.5], [0.5, 0.5, 0.5])])

predictor = dlib.shape_predictor('downloaded/shape_predictor_68_face_landmarks.dat')
detector = dlib.get_frontal_face_detector()

aligned_image = align_face(image_path, detector, predictor)

cropped_image = crop_face(image_path, detector, predictor, random_shift=0)

dir, fname = os.path.split(image_path)

aligned_image_path = os.path.join(dir, 'aligned_' + fname)
cropped_image_path = os.path.join(dir, 'cropped_' + fname)

aligned_image.save(aligned_image_path)
cropped_image.save(cropped_image_path)
landmarks_transform = get_stylegan_transform(cropped_image_path, aligned_image_path, detector, predictor)[3]

net, opts = load_encoder(model_path)

opts.n_iters_per_batch = 3 # default 3
opts.resize_outputs = False

transformed_image = transform_fn(aligned_image)
avg_image = get_average_image(net)

with torch.no_grad():
    result_batch, result_latents = run_on_batch(inputs=transformed_image.unsqueeze(0).cuda().float(),
                                                net=net,
                                                opts=opts,
                                                avg_image=avg_image,
                                                landmarks_transform=torch.from_numpy(landmarks_transform).cuda().float())

from editing.interfacegan.face_editor import FaceEditor
from models.stylegan3.model import GeneratorType

editor = FaceEditor(net.decoder, GeneratorType.ALIGNED)

input_latent = torch.from_numpy(result_latents[0][-1]).unsqueeze(0).cuda()

edit_images, edit_latents = editor.edit(latents=input_latent,
                                        direction=edit_direction,
                                        factor_range=(min_value, max_value),
                                        user_transforms=landmarks_transform,
                                        apply_user_transformations=True)

results = [image[0] for image in edit_images]

os.makedirs('output', exist_ok=True)

for i, result in enumerate(results):
    result.save(os.path.join('output', f'{i}.jpg'))
実行方法は以下のヘルプが参考になります。
optional arguments:
  -h, --help            show this help message and exit
  --input INPUT         path of image file
  --direction DIRECTION
                        age, smile, pose, or Male
  --min MIN             min:-10, max:10, step:1
  --max MAX             min:-10, max:10, step:1
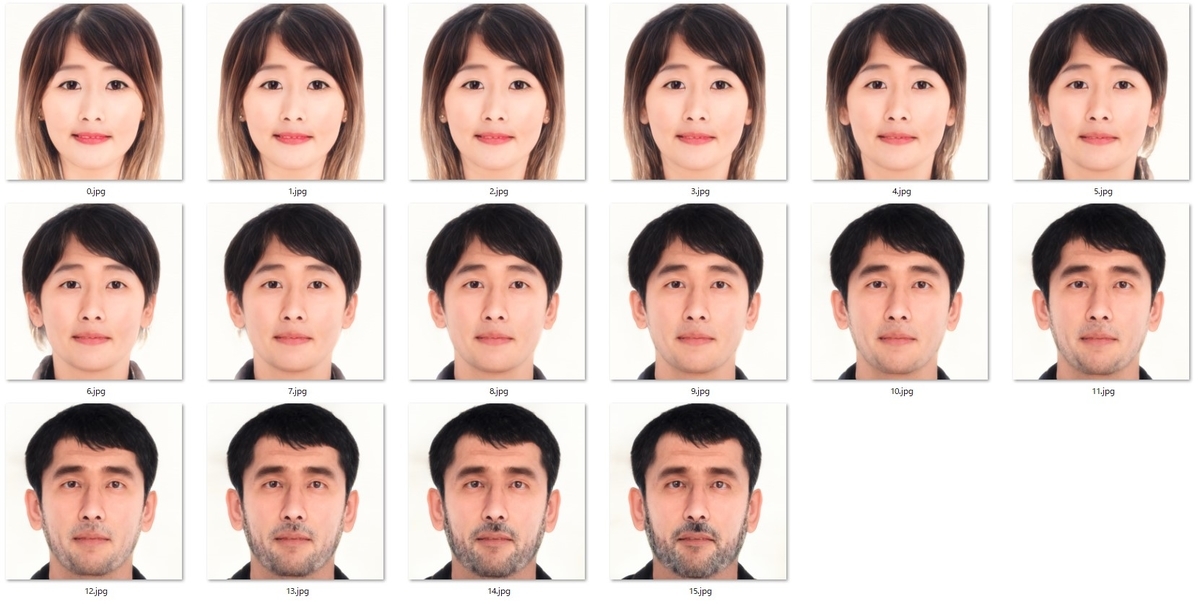
例えばこのようにします。(スクリプトファイルの名前は「exe.py」としています)
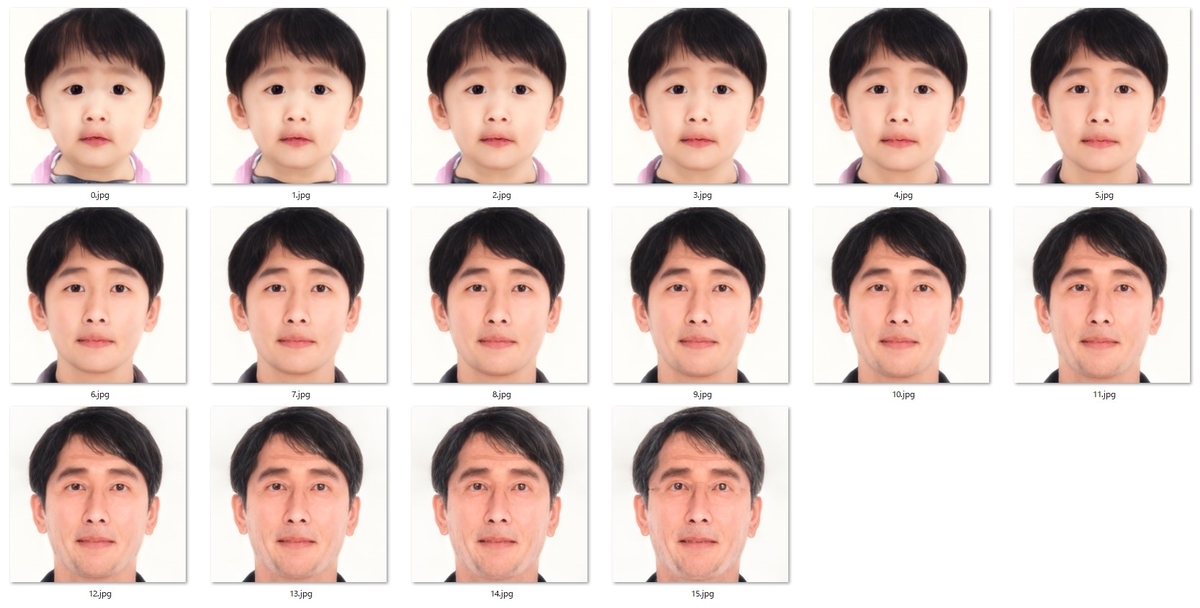
python exe.py --input face.jpg --direction age --min -8 --max 8
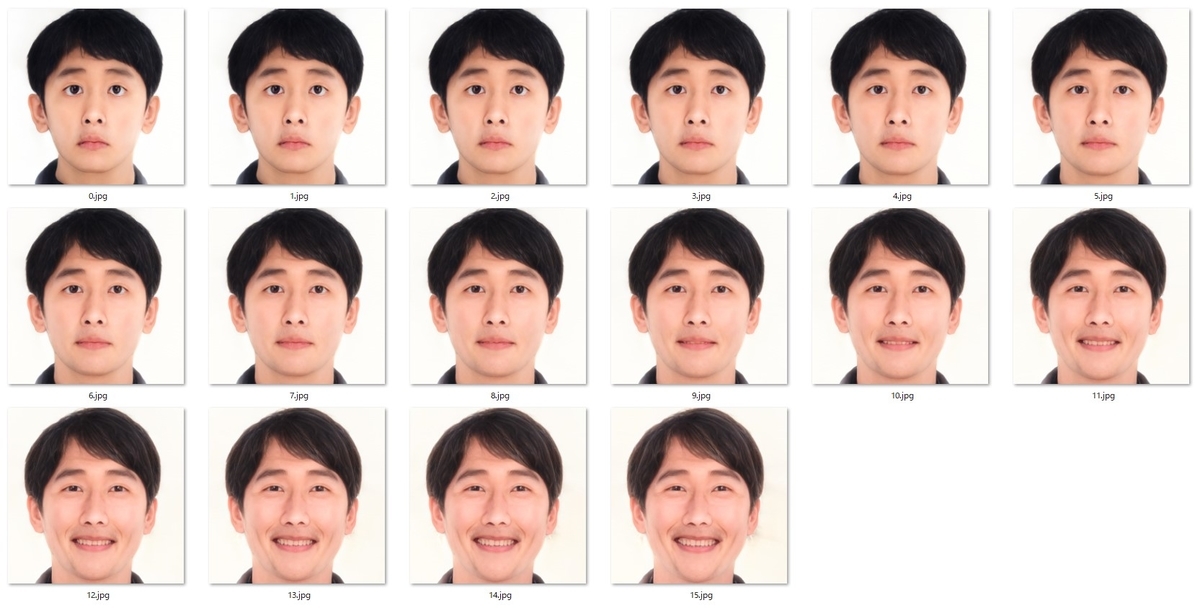
python exe.py --input face.jpg --direction smile --min -8 --max 8
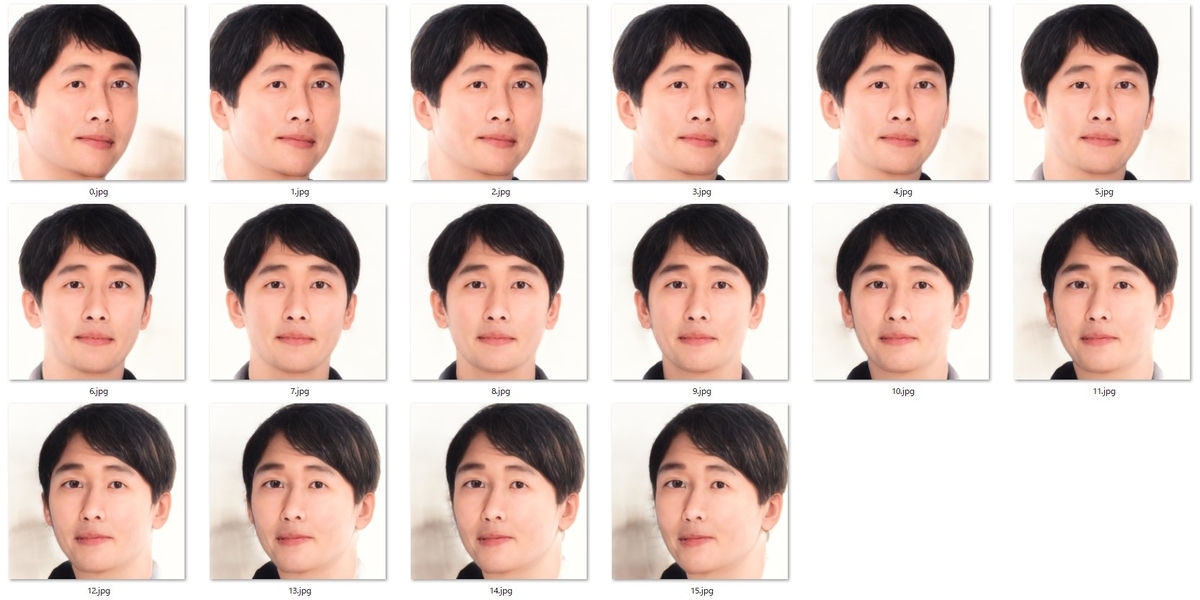
python exe.py --input face.jpg --direction pose --min -8 --max 8
python exe.py --input face.jpg --direction Male --min -8 --max 8
補足
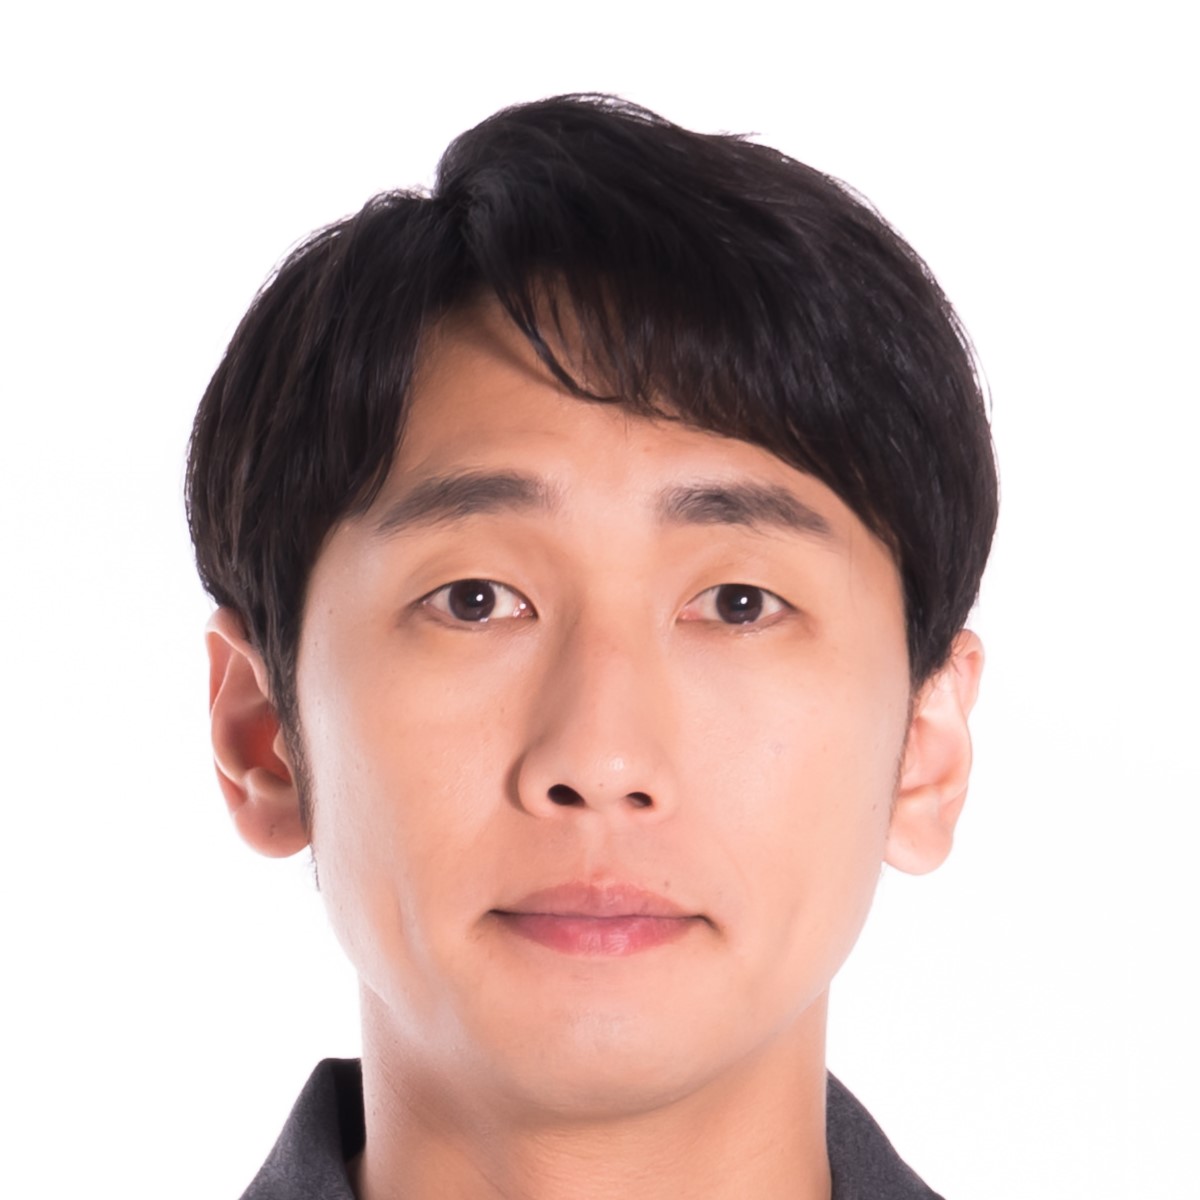
今回はフリー素材「ぱくたそ」から顔写真を使わせて頂きました。こちらの写真です。