はじめに
以前「DragGAN」について記事を書きました。touch-sp.hatenablog.com
「DragGAN」はGAN(敵対的生成ネットワーク)を使っています。
今回紹介する「SDE Drag」は拡散モデルを使ったものになります。
目的
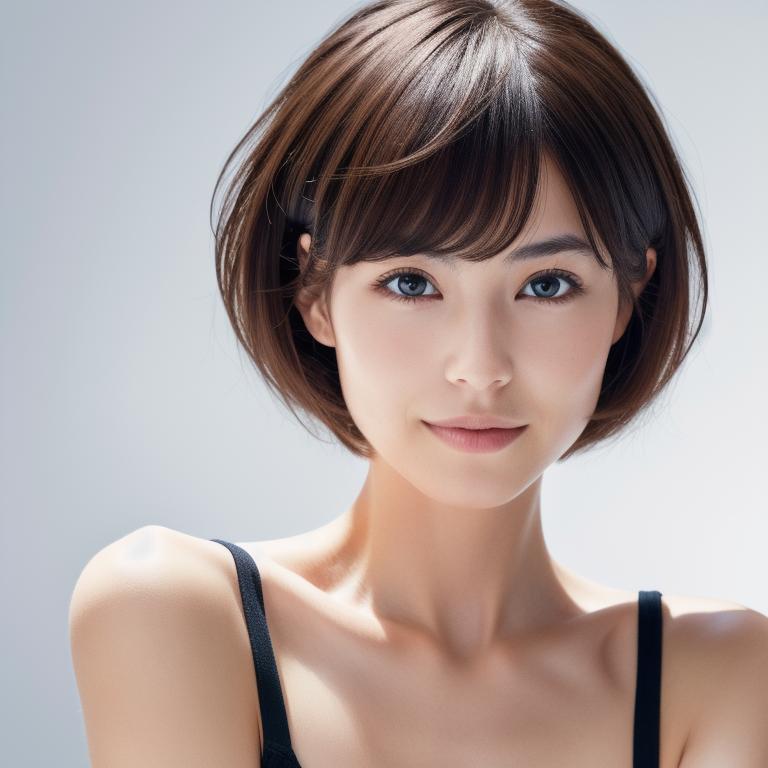
以下の女性の髪を伸ばしてみます。
この女性はこちらの記事で「Beautiful Realistic Asians V7」を使って作成したものです。
touch-sp.hatenablog.com
結果
右側が今回作成したものです。
PC環境
Windows 11
CUDA 11.8
Python 3.11
Python環境構築
pip install torch==2.0.1+cu118 torchvision==0.15.2+cu118 --index-url https://download.pytorch.org/whl/cu118
pip install git+https://github.com/huggingface/diffusers
pip install accelerate transformers opencv-python
準備
mask画像を作成して、ソースポイントとターゲットポイントを決める必要があります。順にそれらを作成するためのPythonスクリプトを書きました。import cv2 import numpy as np import yaml import argparse parser = argparse.ArgumentParser() parser.add_argument( '--image', type=str, help='original image' ) opt = parser.parse_args() img_path = opt.image def switch_mode(position): global mode mode = cv2.getTrackbarPos("mode", "image") def draw(event,x,y, flags, param): global point_drawing, mask_drawing, start_points, end_points, show_image, mask_image, first_x, first_y if mode == 0: if event == cv2.EVENT_LBUTTONDOWN: mask_drawing = True elif event == cv2.EVENT_MOUSEMOVE: if mask_drawing == True: size = 10 cv2.circle(show_image, (x, y), size, (0, 255, 0), -1) cv2.circle(mask_image, (x, y), size, 255, -1) elif event == cv2.EVENT_LBUTTONUP: mask_drawing = False else: if event == cv2.EVENT_LBUTTONDOWN: if point_drawing == 0: first_x, first_y = x, y cv2.circle(show_image, (x, y), 6, (255, 0, 0), -1) point_drawing = 1 elif point_drawing == 1: cv2.line(show_image, (first_x, first_y), (x, y), (255, 255, 255), 2) cv2.circle(show_image, (first_x, first_y), 6, (255, 0, 0), -1) cv2.circle(show_image, (x, y), 6, (0, 0, 255), -1) source_points.append([first_x, first_y]) target_points.append([x, y]) point_drawing = 0 mode = 0 mask_drawing = False point_drawing = 0 first_x, first_y = 0, 0 source_points = [] target_points = [] original_image = cv2.imread(img_path) width, height = original_image.shape[0:2] show_image = original_image.copy() mask_image = np.zeros((width, height)) cv2.namedWindow('image', cv2.WINDOW_NORMAL) cv2.resizeWindow('image', width, height) cv2.setMouseCallback('image', draw) cv2.createTrackbar("mode", "image", mode, 1, switch_mode) while True: key = cv2.waitKey(1) & 0xFF if key == 27: cv2.imwrite('mask.png', mask_image) break output = cv2.addWeighted(show_image, 0.4, original_image, 0.6, 0) cv2.imshow('image',output) cv2.destroyAllWindows() data ={ "model_path": "model/stable-diffusion-v1-5", "prompt": "japanese woman", "source_points": source_points, "target_points": target_points, "original_image": img_path, "mask_image": "mask.png" } with open("settings.yaml", "w") as f: yaml.dump(data, f)
画像を指定して実行します。
python make_yaml.py --image 1.png
mode 0
まずはmask画像を作成します。緑に塗りつぶしているところがmask部分(変更してほしい部分)です。

mode 1
次にソースポイントとターゲットポイントを決めます。髪の毛にソースポイント(青い点)を置いて、下にターゲットポイント(赤い点)を置きます。

「Esc」キーを押して終了すると「mask.png」と「settings.yaml」が作成されているはずです。
「settings.yaml」の中身はこのようになっています。
mask_image: mask.png
model_path: model/stable-diffusion-v1-5
original_image: 1.png
prompt: japanese woman
source_points:
- - 305
  - 364
- - 637
  - 372
target_points:
- - 295
  - 600
- - 610
  - 596
モデルやプロンプトは適当に書き換える必要があります。
今回はこのようにしました。
mask_image: mask.png
model_path: model/BRA_v7_ema
original_image: 1.png
prompt: japanese woman with long hair
source_points:
- - 305
  - 364
- - 637
  - 372
target_points:
- - 295
  - 600
- - 610
  - 596
実行
先に作った「settings.yaml」を読み込んで実行するPythonスクリプトを書きました。import PIL from diffusers import DDIMScheduler, DiffusionPipeline import yaml with open("settings.yaml", "r") as f: data = yaml.load(f, Loader=yaml.SafeLoader) model_path = data["model_path"] pipe = DiffusionPipeline.from_pretrained( model_path, custom_pipeline="sde_drag") pipe.scheduler = DDIMScheduler.from_config(pipe.scheduler.config) pipe.to('cuda') prompt = data["prompt"] image = PIL.Image.open(data["original_image"]).convert("RGB") mask_image = PIL.Image.open(data["mask_image"]).convert("L") source_points = data["source_points"] target_points = data["target_points"] pipe.train_lora(prompt, image) output = pipe( prompt, image, mask_image, source_points, target_points) output_image = PIL.Image.fromarray(output) output_image.save("output.png")
実行は簡単です。
python run.py