はじめに
使用したのはこちらです。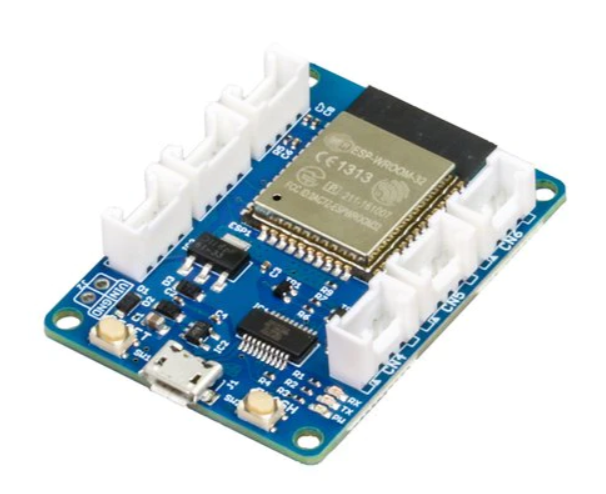
ESPr® Branch 32(Groveコネクタ付き)www.switch-science.com
ESP-WROOM-32に接続したモーターをPCから操作することに挑戦しました。
使用したモータードライバーはこちらです。

HbridgeS UNIT — スイッチサイエンス
M5Stack用VH3.96 - 4ピンユニット [U020] — スイッチサイエンス
VH3.96 - 4ピンユニットは中身を取り出してケースだけ使いました。
可能な限りはんだ付けを避ける方針です(笑)
モータードライバーを使用することでモーターのon/offを切り替えるだけでなく回転を逆にしたり、速度を速くしたり遅くしたりすることが可能になります。
Bluetooth接続の方法
ステップ1
まずはESP-WROOM-32にスケッチを書き込みます。#include "BluetoothSerial.h" String device_name = "ESP32-BT-Slave"; BluetoothSerial SerialBT; const int motor1 = 26; const int motor2 = 15; int motion; // 0:stop 1:forward 2:back void setup() { pinMode(motor1, OUTPUT); pinMode(motor2, OUTPUT); analogWrite(motor1, 0); analogWrite(motor2, 0); motion = 0; Serial.begin(115200); SerialBT.begin(device_name); //Bluetooth device name } void loop() { if(SerialBT.available()>0){ int var = SerialBT.read(); switch(var){ case 0: analogWrite(motor1, 0); analogWrite(motor2, 0); motion = 0; break; case 1: if(motion==2){ analogWrite(motor1, 0); analogWrite(motor2, 0); delay(200); } analogWrite(motor1, 100); analogWrite(motor2, 0); motion = 1; break; case 2: if(motion==1){ analogWrite(motor1, 0); analogWrite(motor2, 0); delay(200); } analogWrite(motor1, 0); analogWrite(motor2, 100); motion = 2; break; default: break; } delay(200); } }
書き込みが終了したらESP-WROOM-32側のBluetooth設定は終了です。
Bluetooth接続に必須の部分はこれだけです。
#include "BluetoothSerial.h"
String device_name = "ESP32-BT-Slave";
BluetoothSerial SerialBT;

void setup() {
  Serial.begin(115200);
  SerialBT.begin(device_name); //Bluetooth device name
}
スケッチ中の「100」はモーターの回転速度を表します。0-255の間で変更すると回転速度が変えられます。
今回は単純化のために「100」に固定しています。
ステップ2
PC側からESP-WROOM-32側に接続をします。設定のBluetoothとデバイスを選択し「デバイスの追加」ボタンの横をクリックします。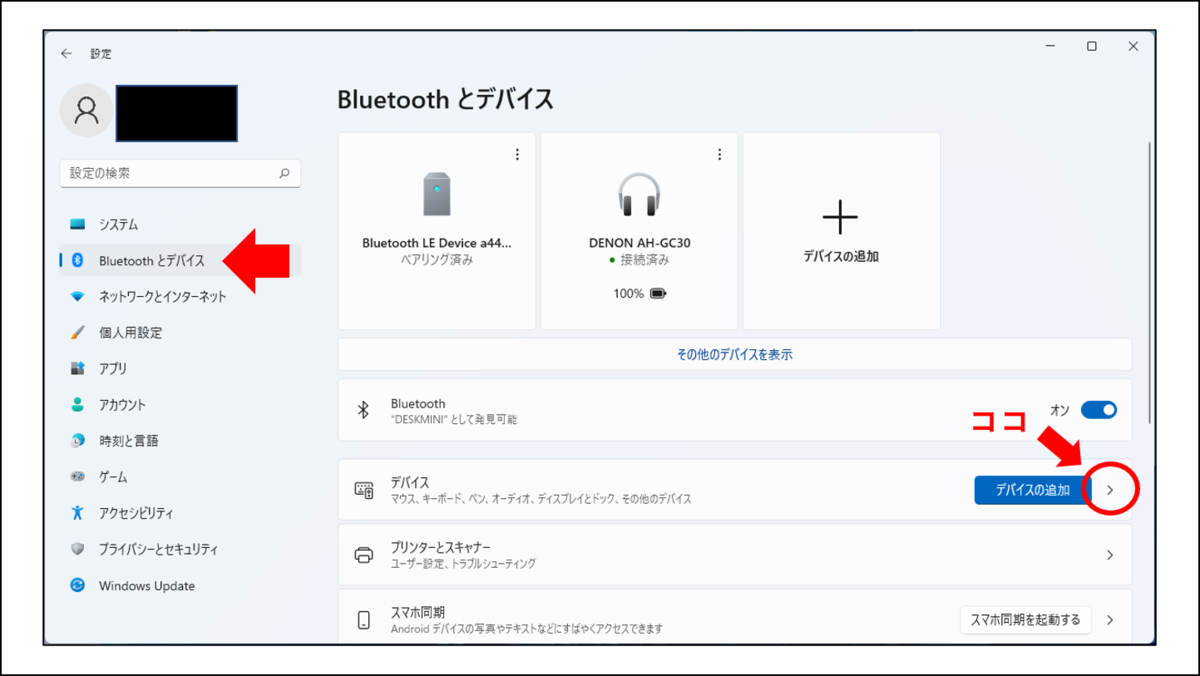
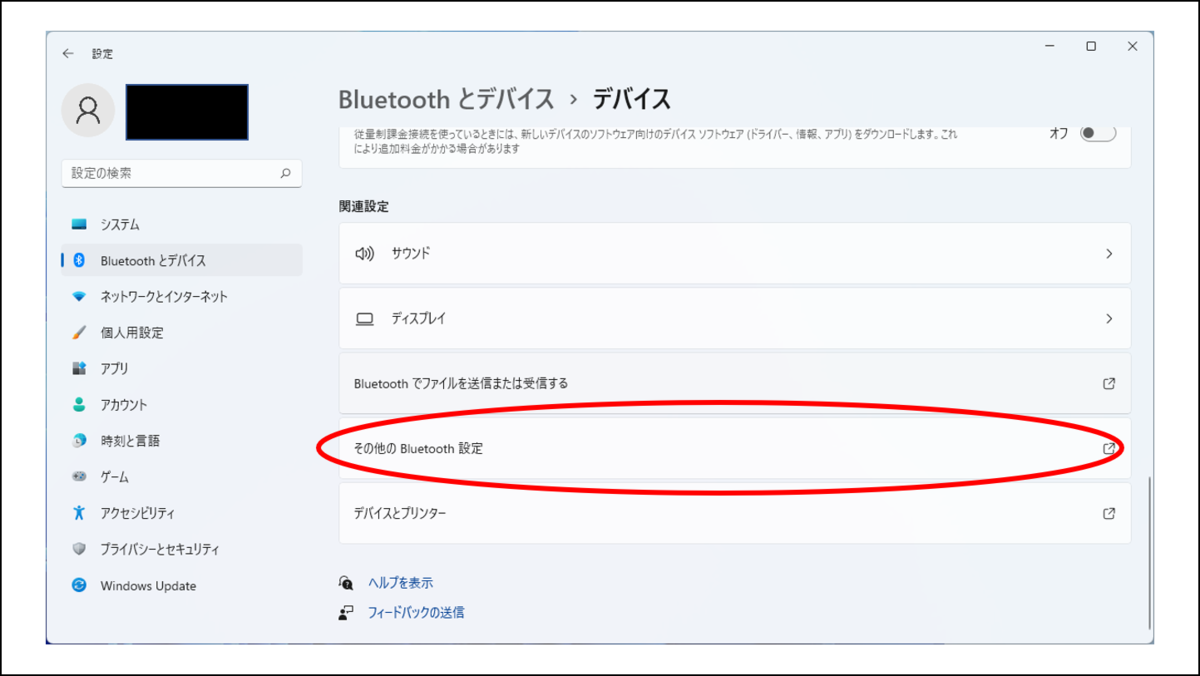
その他のBluetooth設定を選択します。
COMポートを追加します。
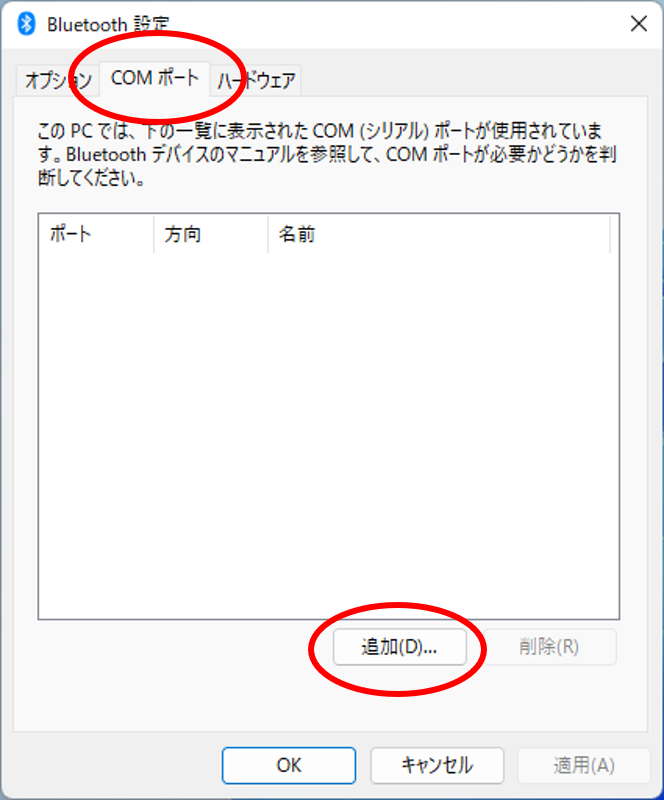

自分の環境ではCOM9というのが追加されました。

これでPC側のBluetooth設定は終了です。
COMポートの追加を自動にすることもできますが動作が安定しないため上記のやり方が確実と思います。
自動にするといきなり3つのCOMポートが追加されたりして挙動がよくわかりませんでした。
ステップ3
Pythonの「pyserial」ライブラリを使ってシリアル通信を行います。その時にステップ2で追加した「COM9」を使います。PC側で以下を実行するとBluetooth経由で信号を送信できます。import serial, time print("Open Port") ser =serial.Serial('COM9', 115200) time.sleep(1.5) while(True): input_key = input('入力:') if input_key == 'q': break elif input_key == 's': ser.write((0).to_bytes(1, 'big')) elif input_key == 'f': ser.write((1).to_bytes(1, 'big')) elif input_key == 'b': ser.write((2).to_bytes(1, 'big')) else: None print("Close Port") ser.close()
これでPCからモーターの遠隔制御が可能になりました。
適当にタイヤをつければ曲がれないラジコンの完成です。

「f」を入力するとforward(前進)
「b」を入力するとback(後退)
「s」を入力するとstop(停止)
使用したのは以下のものです。
タミヤ ユニバーサルプレート
タミヤ 3速クランクギヤーボックスセット
タミヤ スポーツタイヤセット (56mm径)
タミヤ ボールキャスター (2セット入)
1.2V充電池4本と電池ボックス