はじめに
以前も同様のことをした。
touch-sp.hatenablog.com
今回はデータをPascal VOC formatで扱ってみる。
データのダウンロードと解凍
host.robots.ox.ac.uk
上のサイトから「VOCtrainval_11-May-2012.tar」をダウンロード。
ダウンロードしたファイルは解凍が必要であるが今回はPythonを使った。
(Windowsでも動作する)
import tarfile

data_file = 'VOCtrainval_11-May-2012.tar'
with tarfile.open(data_file) as tar:
    tar.extractall(path='.')
データの加工
解凍したファイルのフォルダ構造は以下のようになっている。
VOCdevkit
└─VOC2012
    ├─Annotations
    ├─ImageSets
    │  ├─Action
    │  ├─Layout
    │  ├─Main
    │  └─Segmentation
    ├─JPEGImages
    ├─SegmentationClass
└─SegmentationObjectAnnotationsフォルダ内にはxmlファイルがはいっている。その中の一つを見てみる(「2007_002079.xml」)
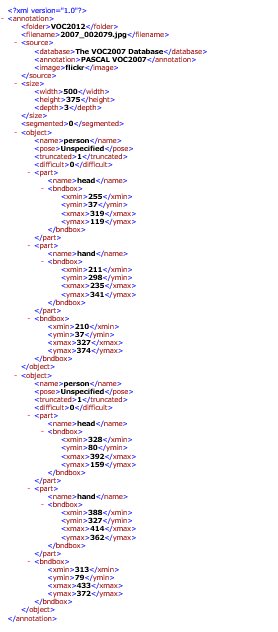
今回は「object/part」下の「head」のみを学習データとして使う。
「object」下の「person」にアクセスするにはgluoncvのVOCDetectionを使えばよい。
「object/part」下の「head」に簡単にアクセスする方法が見つけられなかった。
今回は強引にXMLファイルを書き換えることにした。こうすることによってVOCDetectionが使える。
import glob
import os
import shutil
import xml.etree.ElementTree as ET

root1 = 'VOCdevkit'
root2 = 'VOC2012'
root3 = 'ImageSets'

shutil.rmtree(os.path.join(root1, root2, root3, 'Main'))
os.mkdir(os.path.join(root1, root2, root3, 'Main'))

all_xml_pass = glob.glob(os.path.join(root1, root2, 'Annotations','*.xml'))

train_data = []

for each_xml_pass in all_xml_pass:
    xml_filename = os.path.basename(each_xml_pass)

    tree = ET.parse(each_xml_pass)
    root = tree.getroot()

    bndbox_all = []
    for child in root.findall('object/part'):
        bndbox = []
        if child.find('name').text == 'head':
            bndbox.append(child.find('bndbox/xmin').text)
            bndbox.append(child.find('bndbox/ymin').text)
            bndbox.append(child.find('bndbox/xmax').text)
            bndbox.append(child.find('bndbox/ymax').text)
        if len(bndbox)>0:
            bndbox_all.append(bndbox)

    if len(bndbox_all)>0:

        train_data.append(xml_filename.replace('.xml', ''))

        jpg_filename = xml_filename.replace('xml', 'jpg')

        new_root = ET.Element('annotation')

        ET.SubElement(new_root, 'filename').text = jpg_filename

        Size = ET.SubElement(new_root, 'size')
        ET.SubElement(Size, 'width').text = root.find('size/width').text
        ET.SubElement(Size, 'height').text = root.find('size/height').text
        ET.SubElement(Size, 'depth').text = root.find('size/depth').text

        for new_budbox in bndbox_all:
            Object = ET.SubElement(new_root, 'object')

            ET.SubElement(Object, 'name').text = 'head'
            ET.SubElement(Object, 'difficult').text = '0'

            Bndbox = ET.SubElement(Object, 'bndbox')
            ET.SubElement(Bndbox, 'xmin').text = new_budbox[0]
            ET.SubElement(Bndbox, 'ymin').text = new_budbox[1]
            ET.SubElement(Bndbox, 'xmax').text = new_budbox[2]
            ET.SubElement(Bndbox, 'ymax').text = new_budbox[3]

        new_tree = ET.ElementTree(new_root)

        new_tree.write(os.path.join(root1, root2, 'Annotations', xml_filename))

text = "\n".join(train_data)
with open(os.path.join(root1, root2, root3, 'Main', 'train.txt'), "w") as f:
    f.write(text)
新しく作成したXMLファイルがこちら。

データの確認
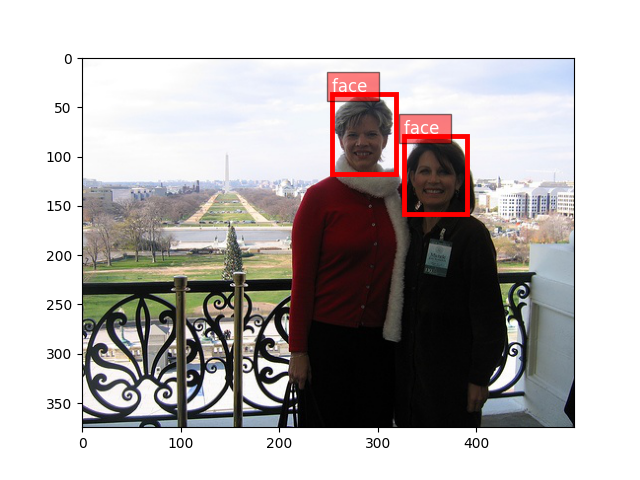
from gluoncv import utils
from gluoncv.data import VOCDetection
from matplotlib import pyplot as plt

VOCDetection.CLASSES = ['head']
train_dataset = VOCDetection(root='VOCdevkit', splits=((2012,'train'),))

train_image, train_label = train_dataset[10]

bounding_boxes = train_label[:, :4]
class_ids = train_label[:, 4:5]

utils.viz.plot_bbox(train_image.asnumpy(), bounding_boxes, scores=None,
                    labels=class_ids, class_names=['face'])

plt.show()
動作環境
Windows 10
Python 3.7.9
certifi==2020.6.20
chardet==3.0.4
cycler==0.10.0
gluoncv==0.8.0
graphviz==0.8.4
idna==2.6
kiwisolver==1.2.0
matplotlib==3.3.2
mxnet==1.7.0
numpy==1.16.6
Pillow==8.0.0
portalocker==2.0.0
pyparsing==2.4.7
python-dateutil==2.8.1
pywin32==228
requests==2.18.4
scipy==1.5.3
six==1.15.0
tqdm==4.50.2
urllib3==1.2
インストールしたのは「mxnet」と「gluoncv」のみ。その他は勝手についてくる。
pip install mxnet==1.7.0 -f https://dist.mxnet.io/python/cpu
pip install gluoncv