この記事は2021年12月18日に更新しています。
はじめに
以前GluonCVを使って同様のことをしました。touch-sp.hatenablog.com
今回はAutoGluonを使って行います。
また、前回AutoGluonを使った顔検出の学習について書きました。
touch-sp.hatenablog.com
前回との違いは
- 検出するクラスが1個から2個に増えていること
- 公開されたデータセットを使うのではなく学習データを自前で準備したこと
学習データ
学習データの準備は以前と同様です。①動画を撮影する
②Object Trackingを行い、結果をVOC formatで出力する
詳細はこちらを参照して下さい。
最終的なフォルダ構造が異なるためObject Trackingのスクリプトは以下のものを使用しました。
import os
import mxnet as mx
from gluoncv import model_zoo
from gluoncv.model_zoo.siamrpn.siamrpn_tracker import SiamRPNTracker
import cv2
import xml.etree.ElementTree as ET

#=========================================================
ctx = mx.gpu()

video_list = ['video_1.mp4', 'video_2.mp4']

class_list = ['target', 'green']

#最初のポジション
#(左上X座標、左上Y座標、横の大きさ、縦の大きさ)
first_position_list = [[462, 100, 84, 120], [429, 182, 84, 118]]

#=========================================================

out_path = 'train_data'
annotation_dir = os.path.join(out_path, 'Annotations')
main_dir =  os.path.join(out_path, 'ImageSets/Main')
jpegimages_dir = os.path.join(out_path, 'JPEGImages')

os.makedirs(annotation_dir, exist_ok=True)
os.makedirs(main_dir, exist_ok=True)
os.makedirs(jpegimages_dir, exist_ok=True)

# モデルを取得する
net = model_zoo.get_model('siamrpn_alexnet_v2_otb15', pretrained=True, root='./models', ctx=ctx)
tracker = SiamRPNTracker(net)

jpeg_filenames_list = []

for i in range(len(video_list)):

    # mp4データを読み込む
    video_frames = []
    cap = cv2.VideoCapture(video_list[i])
    while(True):
        ret, img = cap.read()
        if not ret:
            break
        video_frames.append(img)

    for ind, frame in enumerate(video_frames):
        if ind == 0:
            tracker.init(frame, first_position_list[i], ctx=ctx)
            pred_bbox = first_position_list[i]
        else:
            outputs = tracker.track(frame, ctx=ctx)
            pred_bbox = outputs['bbox']

        pred_bbox = list(map(int, pred_bbox))

        filename = '%d_%06d'%(i, ind)

        #画像の保存
        jpeg_filename = filename + '.jpg'
        cv2.imwrite(os.path.join(jpegimages_dir, jpeg_filename), frame)

        #テキストファイルの作成
        jpeg_filenames_list.append(filename)

        #XMLファイルの保存
        xml_filename = filename + '.xml'

        new_root = ET.Element('annotation')

        ET.SubElement(new_root, 'filename').text = jpeg_filename

        Size = ET.SubElement(new_root, 'size')
        ET.SubElement(Size, 'width').text = str(frame.shape[1])
        ET.SubElement(Size, 'height').text = str(frame.shape[0])
        ET.SubElement(Size, 'depth').text = str(frame.shape[2])

        Object = ET.SubElement(new_root, 'object')

        ET.SubElement(Object, 'name').text = class_list[i]

        ET.SubElement(Object, 'difficult').text = '0'

        Bndbox = ET.SubElement(Object, 'bndbox')
        ET.SubElement(Bndbox, 'xmin').text = str(pred_bbox[0])
        ET.SubElement(Bndbox, 'ymin').text = str(pred_bbox[1])
        ET.SubElement(Bndbox, 'xmax').text = str(pred_bbox[0]+pred_bbox[2])
        ET.SubElement(Bndbox, 'ymax').text = str(pred_bbox[1]+pred_bbox[3])

        new_tree = ET.ElementTree(new_root)

        new_tree.write(os.path.join(annotation_dir, xml_filename))

#テキストファイルの保存
text = "\n".join(jpeg_filenames_list)
with open(os.path.join(main_dir, 'train.txt'), "w") as f:
    f.write(text)
学習
from autogluon.vision import ObjectDetector

dataset_train = ObjectDetector.Dataset.from_voc('train_data', splits='train')

time_limit = 5*60*60  # 5 hour
detector = ObjectDetector()
hyperparameters = {'batch_size':4, 'epochs': 2}
detector.fit(dataset_train, time_limit=time_limit, hyperparameters=hyperparameters)

detector.save('enemy_detector.ag')
結果
タイムリミットを5時間に設定していますが実際は10分かかりませんでした。Finished, total runtime is 338.58 s
結果を確認するためのスクリプトがこちらです。
「IMG_2293.jpg」は写真を1枚取って準備しました。
import numpy as np
from matplotlib import pyplot as plt

from mxnet import image
from gluoncv import utils

import autogluon.core as ag
from autogluon.vision import ObjectDetector

detector = ObjectDetector.load('enemy_detector.ag')

img_file = 'IMG_2293.jpg'

image_array = image.imread(img_file)

result = detector.predict(image_array)
selected_result = result[result['predict_score']>0.8]

class_names = list(set(selected_result['predict_class']))

bounding_boxes = np.array([[x[i] for i in x.keys()] for x in list(selected_result.iloc[:,2])])

scores = np.array(selected_result.iloc[:,1])

class_ids = np.array([class_names.index(i) for i in list(selected_result.iloc[:,0])])

utils.viz.plot_bbox(image_array, bounding_boxes, scores=scores,
                    labels=class_ids, class_names = class_names, absolute_coordinates=False)

plt.show()
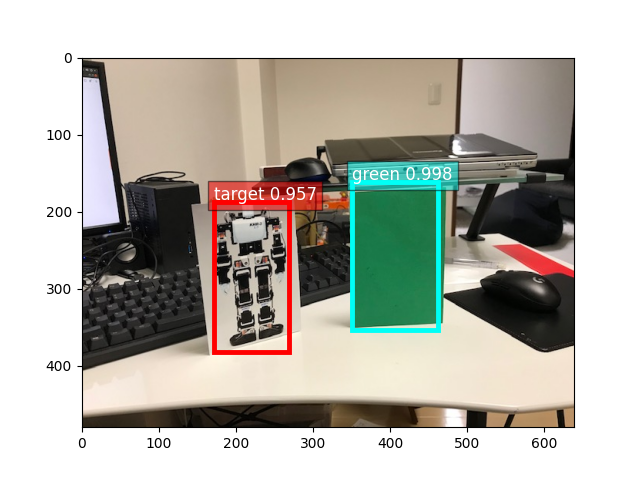
エポック 2で十分な結果が得られました。
動作環境
Intel(R) Core(TM) i7-7700K
RAM 32G
GTX 1080
Ubuntu 20.04 on WSL2
Python3.8.10
mxnet-cu112==1.8.0.post0
autogluon==0.3.0
詳細はこちらを参照して下さい。
touch-sp.hatenablog.com
touch-sp.hatenablog.com
![]()