はじめに
Object Trackingの記事を書いた。
touch-sp.hatenablog.com
何のためにObject Trackingが必要か?
自分にとっては物体検出モデルの学習データ作成に必要である。
学習データに使えることは以前検証した。
touch-sp.hatenablog.com
今回はObject Trackingの結果をVOC formatで書き出すためのスクリプトを書いた。
Pythonスクリプト
import os
import mxnet as mx
from gluoncv import model_zoo
from gluoncv.model_zoo.siamrpn.siamrpn_tracker import SiamRPNTracker
import cv2
import xml.etree.cElementTree as ET

#=========================================================
ctx = mx.gpu()

video_path = 'Coke.mp4'

#最初のポジション
#(左上X座標、左上Y座標、横の大きさ、縦の大きさ)
gt_bbox = [297, 158, 44, 85]

annotation_dir = 'new_data/VOC2020/Annotations'
main_dir =  'new_data/VOC2020/ImageSets/Main'
jpegimages_dir = 'new_data/VOC2020/JPEGImages'
#=========================================================

# mp4データを読み込む
video_frames = []
cap = cv2.VideoCapture(video_path)
while(True):
    ret, img = cap.read()
    if not ret:
        break
    video_frames.append(img)

# モデルを取得する
net = model_zoo.get_model('siamrpn_alexnet_v2_otb15', pretrained=True, root='./models', ctx=ctx)
tracker = SiamRPNTracker(net)

os.makedirs(annotation_dir)
os.makedirs(main_dir)
os.makedirs(jpegimages_dir)

jpeg_filenames_list = []

for ind, frame in enumerate(video_frames):
    if ind == 0:
        tracker.init(frame, gt_bbox, ctx=ctx)
        pred_bbox = gt_bbox
    else:
        outputs = tracker.track(frame, ctx=ctx)
        pred_bbox = outputs['bbox']

    pred_bbox = list(map(int, pred_bbox))

    filename = '%06d'%(ind)

    #画像の保存
    jpeg_filename = filename + '.jpg'
    cv2.imwrite(os.path.join(jpegimages_dir, jpeg_filename), frame)

    #テキストファイルの作成
    jpeg_filenames_list.append(filename)

    #XMLファイルの保存
    xml_filename = filename + '.xml'

    new_root = ET.Element('annotation')

    new_filename = ET.SubElement(new_root, 'filename')
    new_filename.text = jpeg_filename

    Size = ET.SubElement(new_root, 'size')
    Width = ET.SubElement(Size, 'width')
    Height = ET.SubElement(Size, 'height')
    Depth = ET.SubElement(Size, 'depth')

    Width.text = str(frame.shape[1])
    Height.text = str(frame.shape[0])
    Depth.text = str(frame.shape[2])

    Object = ET.SubElement(new_root, 'object')

    Name = ET.SubElement(Object, 'name')
    Name.text = 'target'

    Difficult = ET.SubElement(Object, 'difficult')
    Difficult.text = '0'

    Bndbox = ET.SubElement(Object, 'bndbox')
    Xmin = ET.SubElement(Bndbox, 'xmin')
    Ymin = ET.SubElement(Bndbox, 'ymin')
    Xmax = ET.SubElement(Bndbox, 'xmax')
    Ymax = ET.SubElement(Bndbox, 'ymax')

    Xmin.text = str(pred_bbox[0])
    Ymin.text = str(pred_bbox[1])
    Xmax.text = str(pred_bbox[0]+pred_bbox[2])
    Ymax.text = str(pred_bbox[1]+pred_bbox[3])

    new_tree = ET.ElementTree(new_root)

    new_tree.write(os.path.join(annotation_dir, xml_filename))

#テキストファイルの保存
text = "\n".join(jpeg_filenames_list)
with open(os.path.join(main_dir, 'train.txt'), "w") as f:
    f.write(text)
結果
XMLファイルとテキストファイルと画像が作成される。
以下のような構造になっている。
new_data
|
+---VOC2020
    +---Annotations
    |       000000.xml
    |       000001.xml
    |       000002.xml
    |       000003.xml
    |       .....
    |
    +---ImageSets
    |   +---Main
    |           train.txt
    |
    +---JPEGImages
            000000.jpg
            000001.jpg
            000002.jpg
            000003.jpg
            .....
動作環境
Windows10 Pro
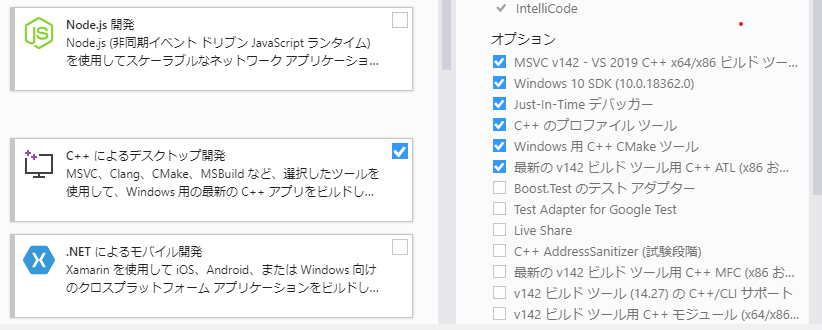
Visual Studio 2019 communityインストール済み(←たぶんこれが必要?)
NVIDIA GeForce GTX1080
Python 3.7.9
CUDA 10.1
もしVisual Studioをインストールしていなくてスクリプトが再現できなければ、試しにインストールしてみるのが良い。
Visual Studioは2017でも良いかもしれない。
Visual Studioはcommunity版であれば無料でインストールできる。
またVisual Studioが必要だとして、Visual Studioの中のどれが必要でどれが必要でないかはよくわからない。
とりあえず自分がインストールしているのは以下の通り。

「mxnet-cu101」と「gluoncv」と「opencv-python」のみインストールした。その他は勝手についてきた。
cuDNNは別途入れていない。(こちらを参照)
pip install mxnet-cu101==1.7.0 -f https://dist.mxnet.io/python/cu101
pip install gluoncv
pip install opencv-python
certifi==2020.6.20
chardet==3.0.4
cycler==0.10.0
gluoncv==0.8.0
graphviz==0.8.4
idna==2.6
kiwisolver==1.2.0
matplotlib==3.3.2
mxnet-cu101==1.7.0
numpy==1.16.6
opencv-python==4.4.0.44
Pillow==8.0.1
portalocker==2.0.0
pyparsing==2.4.7
python-dateutil==2.8.1
pywin32==228
requests==2.18.4
scipy==1.5.3
six==1.15.0
tqdm==4.50.2
urllib3==1.22