公開日:2021年10月16日
最終更新日:2022年9月14日
はじめに
前回MXNet 2.0(ベータ)でGluonCVの学習済み画像分類モデルを使用する方法を書きました。touch-sp.hatenablog.com
今回はMXNet 2.0(ベータ)でGluonCVの学習済み物体検出モデルを使用する方法を書きます。
手順は前回と同様です。
手順
MXNet 1.xでモデルをdownloadしてexport
ここではGluonCVが必要です。from gluoncv import model_zoo from gluoncv.utils import export_block net = model_zoo.get_model('yolo3_darknet53_voc', pretrained=True, root='models') net.hybridize() export_block('yolo3', net, preprocess=None, layout='CHW') with open('detection_class_names.txt', 'w') as f: f.writelines('\n'.join(net.classes))
MXNet 2.0(ベータ)でモデルを読み込んで使用する
MXNet 2.0(ベータ)の環境にGluonCVは必要ありません。MXNet以外にmatplotlibのインストールが必要です。
Method 1
GluonCVの「utils.viz.plot_bbox」を使わない方法です。そのため結果表示のスクリプトが長くなってしまいます。
from mxnet import np, npx, gluon, image
from mxnet.gluon.data.vision import transforms
from matplotlib import pyplot as plt

device = npx.gpu() if npx.num_gpus() > 0 else npx.cpu()

with open('detection_class_names.txt', 'r') as f:
    classes = [x.strip() for x in f.readlines()]

url = 'https://raw.githubusercontent.com/zhreshold/mxnet-ssd/master/data/demo/person.jpg'
img = gluon.utils.download(url)
x = image.imread(img)
x = image.resize_short(x, 512)

transformer = transforms.Compose([
    transforms.ToTensor(),
    transforms.Normalize((0.485, 0.456, 0.406), (0.229, 0.224, 0.225))])

net = gluon.SymbolBlock.imports("yolo3-symbol.json",['data'], "yolo3-0000.params")
net.reset_device(device)

class_IDs, scores, bounding_boxs = net(np.expand_dims(transformer(x), axis=0).to_device(device))

fig = plt.figure()
ax = fig.add_subplot(1, 1, 1)
ax.imshow(x.asnumpy())

colors = dict()
threshold = 0.8
for i, each_score in enumerate(scores[0]):
    if each_score < threshold: break
    score = '{:.3f}'.format(each_score.item())
    class_id = int(class_IDs[0][i].item())
    class_name = classes[class_id]
    if class_id not in colors:
        colors[class_id] = plt.get_cmap('hsv')(class_id / len(classes))
    xmin, ymin, xmax, ymax = [int(x) for x in bounding_boxs[0][i]]
    rect = plt.Rectangle((xmin, ymin), xmax - xmin, ymax - ymin,
                             fill=False,
                             edgecolor=colors[class_id],
                             linewidth=3.5)
    ax.add_patch(rect)
    ax.text(xmin, ymin - 2,
                '{:s} {:s}'.format(class_name, score),
                bbox=dict(facecolor=colors[class_id], alpha=0.5),
                fontsize=12, color='white')

plt.axis('off')
plt.show()
Method 2
MXNet 2.0(ベータ)とGluonCVは共存不可能です。GluonCVをインポートしようとするとエラーが出ます。
最小限のファイルのみをダウンロードして無理やりGluonCVの「utils.viz.plot_bbox」を使う方法です。
from mxnet import np, npx, gluon, image
from mxnet.gluon.utils import download
from mxnet.gluon.data.vision import transforms
from matplotlib import pyplot as plt

device = npx.gpu() if npx.num_gpus() > 0 else npx.cpu()

download('https://raw.githubusercontent.com/dmlc/gluon-cv/master/gluoncv/utils/viz/bbox.py', 'viz/bbox.py')
download('https://raw.githubusercontent.com/dmlc/gluon-cv/master/gluoncv/utils/viz/image.py', 'viz/image.py')
from viz.bbox import plot_bbox

with open('detection_class_names.txt', 'r') as f:
    classes = [x.strip() for x in f.readlines()]

url = 'https://raw.githubusercontent.com/zhreshold/mxnet-ssd/master/data/demo/person.jpg'
img = download(url)
x = image.imread(img)
x = image.resize_short(x, 512)

transformer = transforms.Compose([
    transforms.ToTensor(),
    transforms.Normalize((0.485, 0.456, 0.406), (0.229, 0.224, 0.225))])

net = gluon.SymbolBlock.imports("yolo3-symbol.json",['data'], "yolo3-0000.params")
net.reset_device(device)

class_IDs, scores, bounding_boxs = net(np.expand_dims(transformer(x), axis=0).to_device(device))

ax = plot_bbox(x, bounding_boxs[0], scores[0], class_IDs[0], class_names=classes)
plt.axis('off')
plt.show()
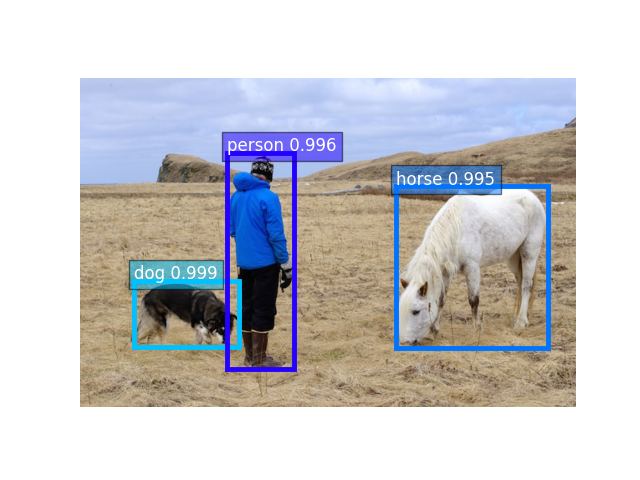
結果
環境
GPUなし
Ubuntu 20.04LTS on WSL2
Python 3.8.10
certifi==2021.10.8
charset-normalizer==2.0.7
cycler==0.11.0
graphviz==0.8.4
idna==3.3
kiwisolver==1.3.2
matplotlib==3.4.3
mxnet==2.0.0b20211105
numpy==1.21.4
Pillow==8.4.0
pkg_resources==0.0.0
pyparsing==3.0.4
python-dateutil==2.8.2
requests==2.26.0
six==1.16.0
urllib3==1.26.7
GPUあり
Ubuntu 20.04 LTS
Ubuntu 20.04LTS on WSL2
Python 3.8.10
certifi==2021.10.8
charset-normalizer==2.0.7
cycler==0.11.0
fonttools==4.28.2
graphviz==0.8.4
idna==3.3
kiwisolver==1.3.2
matplotlib==3.5.0
mxnet-cu112==2.0.0b20211121
numpy==1.21.4
packaging==21.3
Pillow==8.4.0
pkg_resources==0.0.0
pyparsing==3.0.6
python-dateutil==2.8.2
requests==2.26.0
setuptools-scm==6.3.2
six==1.16.0
tomli==1.2.2
urllib3==1.26.7
Ubuntu 22.04 LTS
Ubuntu 22.04LTS on WSL2
Python 3.10.4
certifi==2021.10.8
charset-normalizer==2.0.12
cycler==0.11.0
fonttools==4.33.3
graphviz==0.8.4
idna==3.3
kiwisolver==1.4.2
matplotlib==3.5.2
mxnet-cu112==2.0.0b20220504
numpy==1.22.3
packaging==21.3
Pillow==9.1.0
pyparsing==3.0.8
python-dateutil==2.8.2
requests==2.27.1
six==1.16.0
urllib3==1.26.9
補足
MXNet 1.xとGluonCVを使う場合は非常に簡単です。こちらを参照して下さい。touch-sp.hatenablog.com