はじめに
DiffusersからGLIGENというモデルが使えるようになりました。github.com
ControlNetと非常に似ているものになりますが、ボックスで物体の場所を指定できるところが特徴の一つです。
今回はその特徴を使いながら画像生成をしてみました。
まずはこの画像を見て下さい。
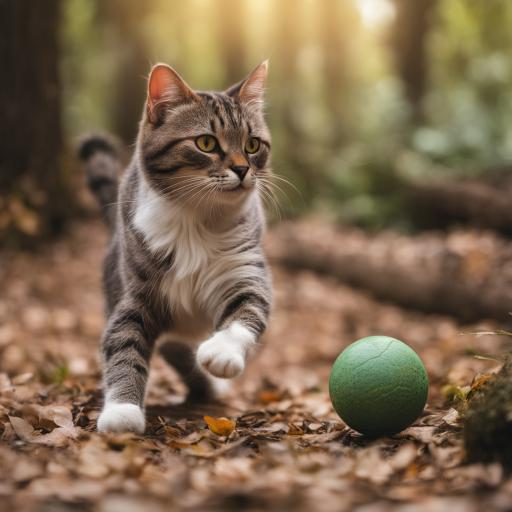
こちらで作成した「ボールで遊ぶ猫」の画像ですが、この構図は指定したものではありません。
たまたま左側に猫、右下にボールの構図になっただけです。
GLIGENでできること
以下のようにボックスを指定して構図を決めることができます。ボックスサイズによってボールの大きさも変えられます。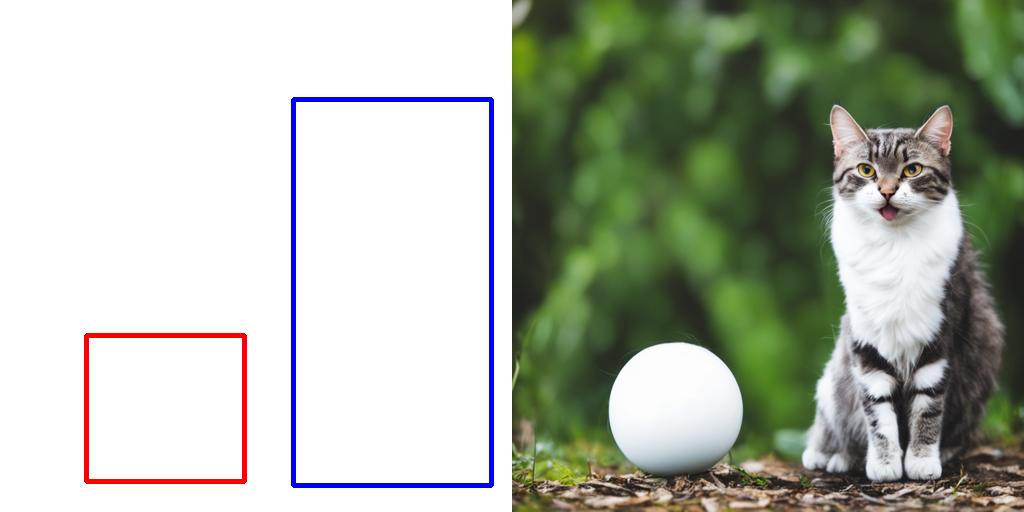
赤枠にボール、青枠に猫が描かれていて狙った通りの構図になりました。
残念なのは「ボールと遊んでいる」感じが全くなくなってしまった事です。
プロンプトは「a cat playing with a white ball in the forest」としているのですがあまり反映されていないようです。
Pythonスクリプト
import torch
from diffusers import StableDiffusionGLIGENPipeline

pipe = StableDiffusionGLIGENPipeline.from_pretrained(
    "masterful/gligen-1-4-generation-text-box",
    variant="fp16",torch_dtype=torch.float16
    ).to("cuda")

prompt = "a cat playing with a white ball in the forest"
boxes = [[0.5742, 0.1934, 0.9590, 0.9492], [0.1684, 0.6547, 0.4766, 0.9414]]
phrases = ["a cat", "a white ball"]

seed = 20000
generator = torch.manual_seed(seed)

image = pipe(
    prompt=prompt,
    gligen_phrases=phrases,
    gligen_boxes=boxes,
    gligen_scheduled_sampling_beta=1,
    output_type="pil",
    num_inference_steps=50,
    generator=generator
    ).images[0]

image.save("cat_and_ball.jpg")
補足
512x512の画像が作成されて、画質もあまり良くありません。今回はSDXLのImage2Imageを使って1024x1024にアップスケールしています。import torch from diffusers import DiffusionPipeline, AutoPipelineForImage2Image from diffusers.utils import load_image pipe = AutoPipelineForImage2Image.from_pretrained( "model/stable-diffusion-xl-base-1.0", torch_dtype=torch.float16, variant="fp16", use_safetensors=True ).to("cuda") refiner = DiffusionPipeline.from_pretrained( "model/stable-diffusion-xl-refiner-1.0", text_encoder_2=pipe.text_encoder_2, vae=pipe.vae, torch_dtype=torch.float16, use_safetensors=True, variant="fp16" ).to("cuda") init_image = load_image("cat_and_ball.jpg").resize((1024, 1024)) prompt = "a cat playing with a white ball in the forest" negative_prompt = "worst quality, low quality" image = pipe( prompt=prompt, negative_prompt=negative_prompt, image=init_image, strength=0.4, output_type="latent" ).images[0] del pipe image = refiner( prompt=prompt, negative_prompt=negative_prompt, image=image[None, :] ).images[0] image.save(f"img2img.png")
おまけ
上記スクリプトのboxesはどうやって決めたか?OpenCVの「selectROI」を使うと簡単です。import numpy as np import cv2 im = np.ones(shape=(512, 512, 3), dtype=np.uint8) * 255 source_window = "draw_rectangle" cv2.namedWindow(source_window) rect = cv2.selectROI(source_window, im, False, False) print(f"xmin:{rect[0] / 512}") print(f"ymin:{rect[1] / 512}") print(f"xmax:{(rect[0]+rect[2]) / 512}") print(f"ymax:{(rect[1]+rect[3]) / 512}") cv2.destroyAllWindows()
追記
「LLM-grounded Diffusion (LMD+)」を使っても同様のことができます。import torch from diffusers import DiffusionPipeline pipe = DiffusionPipeline.from_pretrained( "longlian/lmd_plus", custom_pipeline="llm_grounded_diffusion", variant="fp16", torch_dtype=torch.float16 ) pipe.to("cuda") #pipe.enable_model_cpu_offload() prompt = "a cat playing with a white ball in the forest" boxes = [[0.5742, 0.1934, 0.9590, 0.9492], [0.1684, 0.6547, 0.4766, 0.9414]] phrases = ["a cat", "a white ball"] seed = 20000 generator = torch.manual_seed(seed) images = pipe( prompt=prompt, phrases=phrases, boxes=boxes, gligen_scheduled_sampling_beta=0.4, output_type="pil", num_inference_steps=50, generator=generator, lmd_guidance_kwargs={} ).images images[0].save(f"lmd_plus_seed{seed}.jpg")